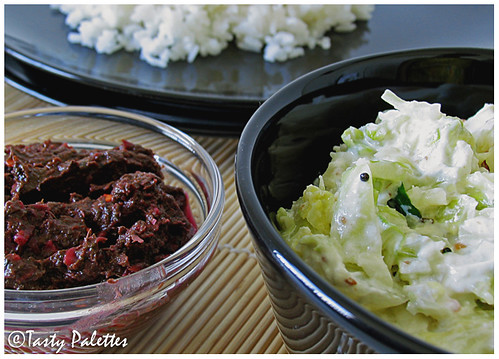
Paruppu Usili and Morkuzhambu

When Cynthia asked “What are some of the foods/dishes you prepare today the same way you liked them while growing up?”, I would say all of my mom’s classic recipes. Particularly paruppu usili and mor kuzhambu. Usili is a time consuming dish and was always prepared for a special Sunday lunch. But there are some recipes that are worth the extra time and effort to recreate our childhood memory. And this classic combo is one of 'em.

Vazhaippoo Paruppu Usili – Banana Flower and Dal Sauté

Banana flower is the classic ingredient used in a usili. Though the dish is time consuming, if prepared in stages, as given below, it can be put together in no time. This is my entry for JFI – Banana, hosted by Mandira of Ahaar. JFI is the brainchild of Indira.

Ingredients

Banana Flower – 1, prepared as instructed below
Toor dal – ½ cup
Chana dal – ½ cup
Dried red chillies – 6
Turmeric powder – ½ + ½ tsp
Asafoetida – a pinch
Mustard seeds – 1 tsp
Curry leaves – few
Oil
Salt

Method

Banana Flower

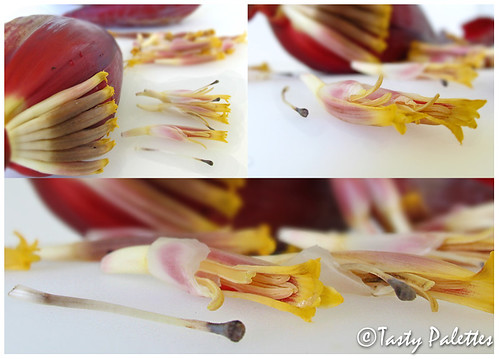
Banana flowers are made of layers of bracts which enclose tiny rows of florets. Remove the outer 2 or 3 tough outer layers exposing the florets. Remove the florets, keep aside. Proceed removing each layer, pulling flowers, until you reach the core. The core, which is slightly bitter, can be eaten raw, or chopped finely and added to the recipe.

In a big bowl, mix ¼ cup of buttermilk with enough water to immerse the chopped banana florets. Take each banana floret and remove the stamen, which is woodsy and has a black tip. The stamens of florets in the inner layers are not developed much and are difficult to remove. Leave them be. Chop the florets prepared thusly and add to the bowl with buttermilk water. This will stop the discolouration of the florets and reduce the bitterness. The flower can be prepared to this stage up to 4 days in advance.

Soak toor and chana dal for an hour. Drain water completely and grind to a coarse mixture along with red chillies, asafoetida, turmeric and salt. Steam this coarse mix for about 10 minutes in a pressure cooker. This can be done using idli plates or a wide vessel. Just remember to oil the plates. When they are done, crumble them by hand. This lentil mixture can be made ahead and frozen for up to 3 months.

Drain the chopped banana flower, cook with salt, turmeric powder and ¼ cup of water. Cook until they are just tender and not mushy. Other vegetables that can be used in place of banana flower are green beans, cluster beans, gherkins (tindora), carrot etc. Mix the cooked vegetable with dal mixture.

In a wok, heat oil, splutter mustard seeds. Add curry leaves and vegetable + dal mix. Sauté until moisture leaves. Serve with rice and mor kuzhambu, with a tsp of sesame oil.

Mor Kuzhambu - Spiced Yogurt

This yogurt based creamy gravy goes perfectly well with the dry, lentil based usili. Use sour buttermilk to get the desired tangy taste. If the buttermilk is not tangy, mix in 2 tbsp of sour cream. Other vegetables that can be used are carrot, drumstick, chow chow (chayote squash) etc. Vegetables like eggplant, okra should be pan-fried and added to the kuzhambu.

Ingredients

Thick buttermilk – 3 cups
White pumpkin – 1 cup, cubed
Grated coconut – 2 tbsps
Ginger – 1 inch piece
Green chillies – 2 or 3
Chana dal – 1 tbsp
Raw rice – 1 tbsp
Mustard seeds – ½ tsp
Curry leaves - few
Carom seeds/Ajwain/Omam or Cumin seeds – ½ tsp
Coconut oil - 2 tsp
Salt
Oil

Method

Soak chana dal and rice for 10 minutes. Grind the soaked dal with green chillies, ginger and coconut to a fine paste. Mix this with buttermilk, carom seeds and salt. Cook white pumpkin with salt and add to the buttermilk gravy.

Put this on a low flame and heat through, taking care not to let it boil. Heat coconut oil, and splutter mustard seeds and toast curry leaves. Add to the kuzhambu and serve.

Paruppu Usili and Mor Kuzhambu

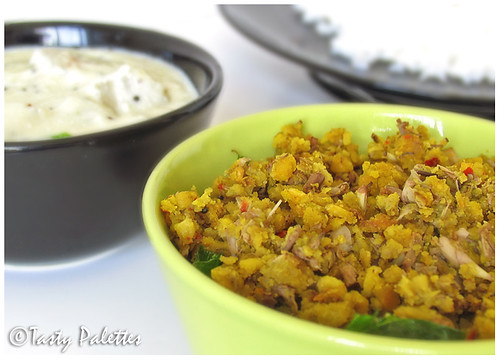
I like to mix usili with rice with a tsp of sesame oil and mor kuzhambu on the side, while G likes to mix kuzhambu with rice and usili on side. It is darn tasty eaten either way.

Tassajara Cookbook

Tassajara (pronounced Tass-a-haara) Zen Mountain Center is a Japanese Buddhist Zen monastery located near Carmel-by-the-Sea, California. The center rigorously practices Zen principles and is open for public for a few months in a year. Tassajara is famous for its vegetarian cuisine and has so far released three cookbooks as found here.

I have never been to this Zen center, but one day I wish to. The photos in the book reached out to my soul bringing serenity and tranquility, true to the institution’s name. If you have visited this center, I would like to hear more from you.

Tassajara Cookbook

Now, I have never been to this Zen center, then how did I come to know of it? This book was a thoughtful gift from our friend M, who happened to be at the Zen center, while the author was signing copies. M, Thank you so much for bestowing me with this wonderful gift. I will make the best use of it.

The book, named “Tassajara Cookbook, lunches, picnics and appetizers", includes an array of spreads, pates, sandwiches, chutneys, salads, dressings, pickles, relishes, cookies and sweets. It focuses on pack-n-go meals, than entrées. And best of all, half the recipes are vegan. As if these incentives aren’t enough, the book, apart from eye-popping pictures, has Zen teachings here and there.

The recipe I chose to prepare from this book is “Sun-dried Tomato Pesto with Walnuts”, because of its simplicity. The recipe as such doesn’t call for any cheese and I find it quite convenient.

Sun-Dried Tomatoes
Sun-Dried Tomatoes

Ingredients

Sun-dried tomatoes – ½ cup
Walnuts – ¼ cup
Garlic – 1 clove
Lemon juice – 2 to 4 tbsp
Extra virgin olive oil – 4 tbsp
Mixed herbs – 2 tbsp (basil, oregano, dill)
Salt

Method

Simmer the sun-dried tomatoes until soft. Alternately, you can steam the tomatoes with ¼ cup of water for about 15 minutes. Pulse all the ingredients, in a food processor, until smooth.

Refrigerate this in an airtight container with the surface covered by a thin layer of oil. This stays good for at least 6 weeks. With this pesto on hand, the possibilities are endless.

1. Serve with grilled vegetables, like squash and potatoes
2. Spread on a crostini or toast with goat cheese.
3. Combine pesto with chopped basil and parmesan and toss with hot pasta.
4. Serve with pizza.
5. Combine pesto with mayonnaise or cream cheese and spread on bread to make favourite sandwich.

I have showcased the book well enough for Nag’s Show and Tell. This is my entry for Waiter! There’s something in my… Savoury Preserve, hosted by Johanna of The Passionate Cook.

Chocolate Soufflés with Pistachios

Even though I am not a big fan of sweets, I do indulge in desserts from time to time. Moderation is the key. Also, making sensible substitutions, like whole milk with skim milk or using egg whites than yolks, makes your indulgence not so guilty. This is one such low fat recipe, adapted from Cooking Light.

Chocolate Soufflés with Pistachios

Soufflés can be intimidating for first timers. But when the directions are followed exactly, they are ‘a piece of cake’! This particular recipe is not a sugary sweet dessert, which is the way I like my chocolate. In my books, chocolate should taste slightly bitter, to appreciate its depth. But, if you like it sweeter, increase sugar or use milk chocolate than semisweet. Also, soufflés, as you see in the photo, collapse very fast. So serve them straight from the oven to the table. Melt-in-your-mouth spongy chocolate with crunchy toasted pistachios is sure to get you Oohs and Aahs from your guests.

Ingredients

Semisweet chocolate - 1 oz (about ¼ cup)
Butter – 1½ + ½ tbsp
Sugar – 10 tbsp + 1 tsp
Cocoa powder – 2 tbsp
All purpose flour or Maida – 2 tbsp
Egg whites – 3
1% Low fat milk – ½ cup
Pistachios – 4 tbsp, chopped
Salt – 1/8 tsp

Method

Preheat oven to 375F. Coat 4 ramekins with ½ tbsp of butter and a tsp of sugar. Place them on a baking sheet.

Combine 5 tbsp of sugar, 1½ tbsp of butter and chocolate in a sauce pan. Cook over low heat until the chocolate is just melted. Add cocoa, flour and salt and whisk until combined. Gradually stir in the milk and cook over medium heat, stirring continuously. After about 3 minutes, the mixture will thicken. Remove from heat and cool.

Beat egg whites until foamy with a high speed hand mixer. Add remaining 5 tbsp of sugar, 1 tbsp at a time and beat until stiff peaks form. Gently fold 1/4th of the egg mixture into chocolate mixture. Repeat the procedure with remaining egg mixture, mixing 1/4th at a time. Spoon into prepared ramekins, sprinkle each ramekin with a tsp of nuts. Bake for 20 minutes and serve immediately.

Chocolate Soufflés with Pistachios

Rice Noodles in Vegetable Sauce

Pasta is versatile. Be it a soup or a salad or an entrée, it lends hand to a cook who has to bring dinner to the table with limited resources. Though called under different names like spaghetti, fettuccine or bucatini, wheat noodles can get boring sometimes. At those times, I jump to the oriental camp and cook with soba or udon noodles. If you are once again bored, then try rice noodles. You will be surprised.

I always have rice noodles in my pantry. Instant idiyappam, as they are called, my mom prepares them as you would prepare any mixed rice. Lemon, coconut, tamarind and tomato are the common flavours. But when I want to get my vegetable fix of the day, I do what I normally do – stir fry. And then serve it with rice noodles.

One of the things I do when I am grocery shopping is stock my freezer with frozen vegetables. Apart from the usual peas, corn, broccoli, I also buy various blends of mixed vegetables. All you have to do for a quick meal is thaw and sauté the vegetables. With a little creativity and few flavoursome sauce ideas, dinner time is something to look forward to.

Ingredients

Rice noodles – ½ packet
Onion – 1
Garlic – 2 cloves
Lemongrass – 1 stalk, minced (optional)
Carrot – 2, cut into thin slices
Baby corn – 1 can, drained and rinsed
Bean sprouts – 1 cup
Tomato puree (canned tomato sauce) – 1 cup
Coriander powder – 1 tsp
Soy sauce – 1 tbsp
Chilli powder or red pepper flakes – 1 tsp
Cilantro
Salt
Oil

Method

Place noodles in a bowl and cover with boiling water. Let stand until it is cooked, according to package instructions. Drain and keep warm.

In a skillet, heat oil, add onion, garlic and lemongrass and sauté until soft. Add carrots, baby corn, tomato puree, coriander powder, soy sauce, chilli powder and salt. Stir to combine. Allow the sauce to bubble and the vegetables to get partially cooked, yet remain crunchy. Add bean sprouts, adjust seasoning and liquid, if necessary. The vegetable mixture has to be soupy to soak the rice noodles.

Spoon the cooked noodles onto a bowl and top with the vegetable mixture with sauce. Garnish with cilantro and serve.

Rice Noodles with Vegetable Sauce

Other vegetables that can go into this bowl are bell peppers, water chestnuts, bamboo shoots etc. You can even add a can of beans of your choice. My favourite way is to sprinkle some toasted peanuts on top.

“Hot Tamale” Burgers and Cream Style Corn

I know I know. Summer is almost gone and am still cooking burgers. But, in the city where I live, summer is still teasing, with temp in high 90s. Also, the burgers were so flavourful, I had to share with you all.

"Hot Tamale" Burgers

This is a recipe I strictly followed from Vegetarian Times. The temptation was too much when I saw these burgers adoring the cover. Boy, am I glad that I tried these dainties. They were tasty, filling and most of all didn’t make me feel guilty eating them. With brown rice and vegetables, there is nothing to worry about.

The recipe calls for cornmeal that goes into tamales and hence the name. Each and every ingredient is carefully chosen to emphasise the South-Western flavours. They were so delicious, that I ate some of the rice mixture even before making the patties.

Chipotle in Adobo sauce is available in most of the super-markets in International foods aisle. Chipotle is smoked jalapeno chilli that is preserved in adobo sauce, which is generally a mixture of tomato puree, vinegar, salt and spices. There can be other ingredients as found here.

Ingredients

Brown rice – ½ cup
Onion – 1, small, finely chopped
Bell pepper – 1, small, finely chopped
Fresh corn kernels – ½ cup
Chipotle in adobo sauce – 1 with 2 tsp of sauce
Cornmeal – ½ cup
Garlic – 2 cloves, minced
Cumin powder – 1 tsp
Cilantro – ½ cup, finely chopped
Lime juice – 1 tbsp
Lime zest – ¾ tsp
Salt
Oil

Method

Cook brown rice until tender. I pressure cooked it with ¾ cup of water until 3 whistles.

In a large skillet, heat a tbsp of oil and sauté onion, bell pepper, corn, chipotle, adobo sauce, garlic, cumin and salt. Cover and cook until the vegetables are tender.

In a bowl, whisk cornmeal and 1/3 cup water without any lumps. Add this to the vegetables in the skillet and mix well. Cover and cook for 10 more minutes, until the whole mixture comes together.

Switch off the flame and stir in cilantro, lime juice and zest. Let cool and make 4 burger patties. Refrigerate for 30 minutes. In the meantime, prepare Cream Style Corn.

Heat oil in a flat bottomed pan, and cook the burger patties until they are brown. If you have access to the grill, grill the patties for 7 minutes per side. Serve on a bun with lettuce, tomato and onion. Or serve on a tortilla to maintain the South-Western style.

Cream Style Corn

Burgers can make you thirsty and I had a perfect accompaniment for that - Cream Style Corn. The recipe is simple as simple can be and totally relies on the quality of the ingredients. So I recommend using fresh ingredients possible. Of course, frozen corn and dried rosemary shouldn’t hurt too.

Cream Styled Corn

Ingredients

Fresh corn kernels – 1½ cup
Cream – 1/3 cup
Milk – 1/3 cup
Fresh rosemary – 2 sprigs, chopped
Salt
Pepper
Butter – 1 tsp

Method

Melt the butter in a skillet and fry rosemary, until it releases aroma. Add corn and sauté for about 3 minutes. The kernels have to become a tad softer and not mushy. Add milk, cream and salt, and bring it to a boil on a low flame. Put off the flame and season with pepper.

Do I have to say we were two happy diners?

Cabbage Mor Kootu and Beet Leaves Thogayal

Cabbage Mor Kootu – Cabbage in Yoghurt

If there is a favourite way to eat cabbage, then this is it, for me. The crunchy cabbage and cool yoghurt in this mildly spiced kootu goes well with almost all of my day-to-day menu. If you are new to Indian cooking, or just want a mild, refreshing side to go with sambar or any other spicy entree, you have come to the right place.

Ingredients

Cabbage – 1, small
Yoghurt – ¾ cup
Grated coconut – 1/3 cup
Green chillies – 2
Cumin seeds – 1 tsp
Mustard seeds – 1 tsp
Curry leaves – few
Oil – 1 tsp
Salt

Method

Slice cabbage into thin, 2 inch long pieces. Cook cabbage with little water and salt. Grind coconut, chillies and cumin seeds to a fine paste. When cabbage becomes soft and not mushy, add the ground mixture. Adjust salt and heat through.

In a seasoning pan heat oil, splutter mustard seeds and throw some curry leaves. Add this to cabbage kootu. Just before serving, mix cabbage with yoghurt.

You can do this kootu in microwave too. Cook cabbage for about 10-12 minutes. After adding the spice mixture, mix well and cook for another 2 minutes. Then follow the recipe as given above.

I like to serve this kootu along with any of the following - mixed rice, thogayal (chutney), sambar, vatral kuzhambu or milagu kozhambu (black pepper gravy).

Cabbage Mor Kootu with Beet Leaves Thogayal

Cabbage mor kootu served with beet leaves thogayal.

Beet Leaves Thogayal

The beetroots that I got from farmer's market had gorgeous greens, I didn't have the heart to throw them away. But I haven't cooked with them before. So, as a safe measure, I made thogayal, and was pleased with the results. The leaves were mildly beet-y and rendered a beautiful purple colour when mixed with rice.

Ingredients

Beet leaves – 2 cups, chopped
Urad dal – 1 tbsp + 1 tsp
Red chillies – 3
Asafoetida – a pinch
Mustard seeds – 1 tsp
Tamarind paste – 1 tsp
Salt
Oil

Method

In a pan, heat oil, and roast 1 tbsp urad dal, red chillies, asafoetida. When dal turns golden brown, add chopped beet leaves and cook until soft. Cool and grind with tamarind and salt. Season with mustard seeds and urad dal. Serve with rice and a tsp of sesame oil.

Vegetable Lo Mein With Soba Noodles

Lo mein is a Chinese cooking method, where boiled noodles are mixed with sauce, vegetables and/or poultry and/or seafood. If the boiled noodles are fried and then sautéed with sauce and vegetables, then the cooking method is called chow mein. Naturally, soft noodles soak up more sauce and therefore lo mein recipes often use more sauce. Instead of ordinary noodles, I have used soba noodles.

Soba Noodles

Soba noodles are Japanese noodles made of buckwheat. These light brown coloured noodles can be served cold with a dipping sauce or hot, as in this recipe. Even though buckwheat is a gluten-free grain (a pseudograin, strictly speaking, since buckwheat is not a grain, rather a fruit), the noodles are made by mixing wheat flour. So people with special dietary needs should be cautious while consuming them. Otherwise, these noodles are an excellent source of protein and good source of fiber.

They are slightly nutty, but when mixed with a sauce, soba noodles hardly taste different than wheat noodles. They cook faster than ordinary noodles too, just 4 minutes. I see no reason why soba noodles shouldn’t be a part of a healthy diet. For nutritional information and details on the brand that I normally buy, visit here. Learn how to make soba noodles from a chef master.

Ingredients

Soba Noodles – ½ lb
Red or green bell pepper – 1
Sugar snap peas – 1 cup, stringed
Carrot – 2, cut into 1 inch cubes
Teriyaki sauce – 1/3-1/2 cup
Garlic – 3 cloves, minced
Ginger – 1 inch piece, finely chopped
Crushed red pepper– 1 tsp
Eggs – 2
Salt
Pepper
Cilantro – 2 tsp, finely chopped
Sesame oil

Method

Cook soba noodles according to package directions. Drain, rinse with cold water, drain again and set aside.

Take a flat bottomed wide skillet. Put this on a medium heat stove and heat a tsp of oil. In a bowl combine eggs, salt and pepper. Whisk to combine and pour into the skillet. Lift and tilt the skillet to form a thin layer of egg on the bottom. Cook, without stirring for 2 to 3 minutes or just until set. Lift the omelette, flip and cook the other side for an additional minute. Slide out onto cutting board, cool slightly and cut into thick strips. Set aside.

In the same skillet, over high heat, heat 2 tsp of oil. Add bell pepper, sugar snap peas, carrot, ginger, garlic and crushed red pepper. Cook and stir for 3 minutes. Add teriyaki sauce and salt and bring to boil. Boil gently for 2 minutes. Add cooked noodles and cilantro to the vegetable mixture, toss well and serve immediately.

Vegetable Lo Mein With Soba Noodles

Roasted Garlic Vinaigrette

Vacations are always reviving. I would say in my mom’s words “recharging my battery”, after the visit to her mom’s place every summer. So true. Be it an extravagant cruise or camping in one’s own backyard, they allow us to pause and breathe new air, much needed in our monotonous lives.

Remember the roasted garlic that I wrote about a few weeks back. I make ‘em in bulk, throw a couple of cloves in stir-fries and soups. But instead of being a side kick always, this is one recipe where it takes a center stage. The smoky garlic and the sweet, yet complex balsamic vinegar are a flavoursome duo.

Roasted Garlic Vinaigrette

Ingredients

Roasted garlic – 1 head
Balsamic vinegar – ¼ cup
Extra virgin olive oil – ¼ cup
Water – 2 tbsp
Sugar – 1 tsp
Salt
Pepper

Method

Squeeze the roasted garlic cloves from the head on to a food processor/mixie. Process until smooth. Add the rest of the ingredients and blend till the dressing is smooth. Drizzle over your favourite salad and enjoy.

To make an ordinary salad fancy, I served ‘em on parmesan cups. Not only do they look good, but also add a salty crunch. This is how you make them. Grate parmesan cheese, heat a small cast iron/non stick pan. Lay tart molds or small cups or shot glasses upside down. Place 1 tbsp of cheese in a small pile, about the size of a quarter of the pan. Cook until the cheese bubbles, melts and turns golden brown. Remove cheese and drape over the cup or shot glass or mold. A word of advice, don’t get distracted while doing this. The cheese goes from soft to crisp in a micro second. Let cool. Pile the greens on the cups and serve with vinaigrette.

Roasted Garlic Vinaigrette
Mixed baby greens served on parmesan cups with roasted garlic vinaigrette.

Amish Friendship Bread

I was intrigued when Nupur wrote to me about a ‘Starter Kit’ for Amish friendship bread. After some research, I was convinced it is not only safe to bake with this starter, it is also super moist and delicious. Although it sits on your countertop for 10 days, most of the days you do nothing other than mixing it once. It was really fun to bake with a sourdough starter, which I haven’t done before. Made me feel like a ‘real’ baker. And, I wholeheartedly thank Nupur for considering me to send this ‘chain letter’.

The package I received had a slightly brown, gooey concoction. It had a “strong ‘sour’ smell and I panicked that it had gone bad. Then further investigation told me that it is the way they are supposed to smell, due to the live culture and had they gone rancid, they would turn pink or orange,. Phew! I was uncertain through each stage as this was the first time for me. But, this starter is so forgiving that even an inexperienced baker can take up this challenge.

Next comes the flavouring part. Apple and cinnamon seem to be the popular option. Although they are a good combination, I am really sick and tired of Apple-Cinnamon in everything, from cakes to air freshener. Then, G came up with the brilliant idea of mimicking a Pineapple Upside-Down cake. Wow! What an idea (he is my sous chef, you see;)).

The cake turned out to be moist and delicious, as everyone claims. The sweet cherry particularly worked superbly with the pineapple. It reminded me of tutty fruity bread that I had back in India.

Even though the starter comes with a sheet of instructions, I am giving the recipe that I followed, as a guidelines to future recipients. I have halved the original recipe to yield one loaf of bread which is more than sufficient for the two of us.

If you are left with the starter without anyone to share, or if you are on a vacation or you just want to reserve a portion for future use, freeze the dough. I read in various forums that it lasts forever. When you are ready to use it, thaw the starter for one whole day and use it in the recipe.

Feel free to add any flavouring by using different pudding mix or fruits. A cup of chopped nuts is also a delicious addition. For a chest of ideas, visit here.

Ingredients

Amish friendship starter – ¾ cup
All purpose flour or maida – 1 cup
Instant vanilla pudding mix – 1 small packet
Crushed pineapple – ½ cup
Pineapple juice – ½ cup
Maraschino cherries – ½ cup
Eggs – 2, small
Oil – ¼ cup
Apple sauce – ¼ cup
Orange zest – 1 tsp
Baking powder – 1 tsp
Baking soda – ½ tsp
Salt – ¼ tsp
Sugar – 2 tbsp

Method

Mix all of the above except cherries. Mixing cherries into the batter results in colour bleeding. Grease a loaf pan with shortening or butter, line the bottom of the pan with cherries. Pour the bread dough. Bake in a 325F oven for 60-65 minutes. If you are not using any fruit, reduce the baking time by 5-10 mins. Test for doneness by inserting a tooth pick and see whether it comes out clean. Invert onto a cooling wrack, cool, slice and serve.

Pineapple-Cherry Amish Friendship Bread

I am so happy to keep the tradition and forward a portion of the starter to Rajitha, Cynthia and Smita. Hope you guys have as much fun as I do. Will meet you all in a week. Till then, Ciao!

Curried Eggplant Rice

When I am uncertain about what to cook for lunch, I bank on mixed rice. Scour your refrigerator for any vegetable, sauté them with appropriate spices, mix with rice and serve with raita and chips. Lunch is taken care of. This is one such recipe I came up with and liked so much, that it goes to my cooking repertoire.

Ingredients

Basmati rice – 1 cup
Indian eggplant – 6 or 7
Onion – 1, chopped
Mustard seeds – ½ tsp
Chana dal – 1 tbsp
Urad dal – 1 tbsp
Curry leaves
Red chillies – 2, broken
Turmeric powder – ¼ tsp
MTR Curry powder or a combination of garam masala, coriander powder and cumin powder – 2 tsp
Salt
Oil

Method

Cook rice in a pressure cooker or on stove top and cool separating each grain.

In a skillet, heat oil, splutter mustard seeds, and add chana dal, urad dal and red chillies. After dal gets brown, add curry leaves, onion and turmeric powder. Let onions turn soft and add chopped eggplants, salt, curry powder. Sauté until eggplant is cooked and roasted well. Mix the cooled rice and adjust seasoning as required. Serve with vegetable salad or raita.

Curried Eggplant Rice

Eggplant rice served with rainbow carrots that I picked from the local farmer’s market.

Mysore Rasam

I have, many a times, mentioned in this blog, about my mom being an excellent cook. So is my Mother-in-Law. Both mine and G’s family hail from the same region in Tamil Nadu. Which means both my mom and MIL cook almost the same way. I didn’t have any getting used to when I joined their family.

Like I have learnt recipes from my mom, I also wish to learn a few from my MIL, which hasn’t been possible so far. Directly, that is. I managed to learn from her indirectly through G’s cookbook. G, being an excellent cook too, has meticulously collected few of her recipes with detailed instructions.

Mysore Rasam

Mysore rasam is one such recipe. This rasam, unlike others, is an indulgence. It is rich, flavourful and thicker like arachu vitta sambar. G’s touch of taking this recipe to the next level is by adding coconut milk, which makes it deliciously creamy, without over powering other spices. Of course, this is optional, but try it once before you decide it. You will be hooked!

Ingredients

Toor dal – ¼ cup
Tamarind paste – 1 tsp
Tomato - 1
Asafoetida – a pinch
Coconut milk – ¼ cup (optional)
Mustard seeds – ½ tsp
Coriander leaves
Ghee – ½ tsp
Salt

To roast and grind

Chana dal – 1 tsp
Red chillies – 3 or 4
Pepper – 1 tsp
Coconut – 2 tbsp
Oil

Method

Pressure cook toor dal till soft. In a tsp of oil, roast chana dal, red chillies and pepper. Switch off the flame and then add coconut. Mix well, cool and grind to a fine paste.

Boil tamarind paste, tomato, asafoetida and ½ cup of water, until raw smell from tamarind goes away. Add the ground mixture, coconut milk and cooked dal and simmer until the rasam is frothy. Do not boil the rasam after adding the dal and spices.

Heat ghee, splutter mustard seeds and add to the rasam. Garnish with coriander leaves and serve rasam with rice.

Mysore Rasam

I am sending this recipe to Asha for RCI – Karnataka along with my wishes for good health and speedy recovery.