The Drunken Vadai a.k.a Sambar Vadai

How many times has sambar been mentioned in this blog? One too many. And there will be more. I wouldn’t be exaggerating if I say sambar is iconic to Tamil Nadu. Sambar is as Tamilian as marinara is Italian. Breakfast, lunch or dinner, this lentil gravy somehow finds its place on the table. Starting your day with idli, dosa, pongal or upma with a side of steaming hot sambar, is enough boot to get one through mid-day. Or rice mixed with sambar, and eaten with any vegetable is a well-balanced lunch or dinner.

What is the reason for this never dying popularity? Because its simple, easy, tasty and most importantly filling. There are countless ways to prepare it and with readymade sambar powder, it can done in a snap. If you don’t like sambar, chances are, you haven’t tasted the right kind.

Sambar Vadai

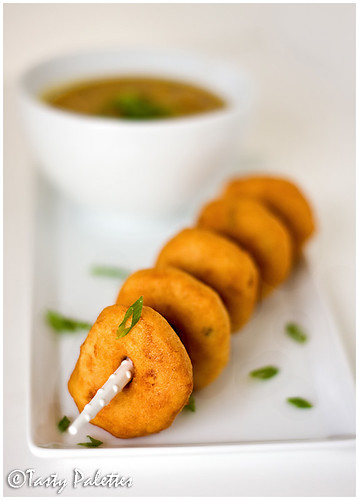
You have seen idli and dosa here. Let me introduce the next in line – vadai or vada. How do I explain it? Lets see, it is a savoury dumpling made out of lentils. Fluffy urad batter is minimally seasoned, fried and served with sambar or chutney.

Sambar vadai is a slight variation, where warm vadas are soaked in hot sambar. The crispy dumpling instantly absorbs the gravy like a sponge. Sambar vadai is delicate like a cloud and melts the moment it touches your mouth. Ah! Culinary nirvana.

Ulundhu Vadai (Urad Vada)
(serves 2)

Making vadai is almost straightforward. Almost, because it takes a little practice to shape it properly. The key is to add very little water while grinding. Don’t lose heart if you can’t get it right. Just drop by spoonfuls into the hot oil. Fried dough tastes great no matter how it is shaped.

Ingredients

Skinned urad dal – ¾ cup
Green chillies – 2, chopped
Curry leaves – few, torn into bits
Ginger – 1 tsp, finely chopped
Water – 2 to 3 tbsp
Salt

Plastic sheet or banana leaf for making vada
Oil for frying

Method

Soak urad dal for 1 hour. Refrigerate for 10 minutes and grind with salt to a smooth paste. Add water by tablespoons only if necessary. Add green chillies, ginger and curry leaves.

Heat oil over medium heat in a kadai or a wide vessel. Take care that the oil is at least 1-inch deep.

Making Vadai

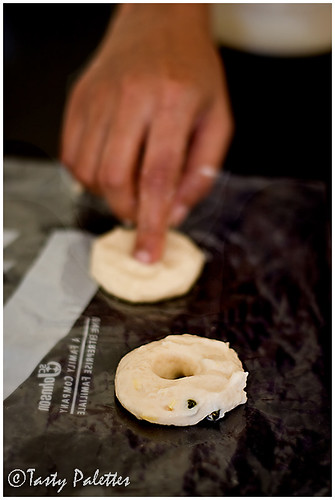
Take the plastic sheet (like Ziploc bag) or banana leaf and wipe with water. Take about ¼ cup of dough on the sheet. Dampen your fingers, slightly flatten the dough and put a hole in the middle. This ensures that the dough gets cooked through. Gently transfer the shaped dough to the oil and deep fry till its golden brown.

Serve warm vadai as such for snacks or soak in hot sambar for 2 minutes and then enjoy, garnished with chopped raw onions, cilantro and/or chopped tomatoes.

Ulundhu Vadai - Urad Vada

Ulundhu vadai, my entry to Click – Beans and Lentils, an event conceived and hosted by the Jugalbandits.

Arachu Vitta Sambar
(serves 4 when served on the side, serves 2 when served as main or when gobbled by the cup)

The recipe for sambar is almost the same as the one here, but for a few changes. Even though the quantity here serves four, make extra. Refrigerate leftovers for up to 5 days. Serve with rice, idli, dosa, upma… well, you get the idea.

Ingredients

Oil – 1 tsp
Mustard seeds – ½ tsp
Curry leaves - few
Quartered shallots or sliced red onions – ½ cup

Toor dal – ½ cup
Moong dal – 1 tbsp
Turmeric powder – 1+1 tsp
Tamarind paste – 2 tbsp
Salt

Cilantro – 2 tbsp, chopped

Spice mixture

Oil – 1 tsp
Coriander seeds – 2 tbsp
Chana dal – 1 ½ tbsp
Dried red chillies – 8
Raw rice – 1 tsp
Fenugreek seeds – ¼ tsp
Grated coconut – 2 tbsp

Red onions – 2 tbsp, chopped
Tomato – ¼ cup, chopped

Heat oil and roast coriander seeds through coconut and grind with onion and tomato to a smooth paste. Alternately, you can grind 2 tbsp of sambar powder (homemade or store-bought) with onion and tomato.

Method

Pressure cook toor dal and moong dal until soft, with 1 tsp of turmeric powder.

In a sauce pan, heat oil, splutter mustard seeds and lightly sauté shallots or red onions with curry leaves. The onions should turn just soft, but still crunchy. Remove and set aside.

In the same pot, boil tamarind paste, salt and the remaining 1 tsp of turmeric powder with 2 cups of water. When tamarind doesn’t smell raw anymore, add the cooked dal, ground spice paste and a cup of water. Simmer for 5 minutes. Remove from heat, add sautéed onions and garnish with cilantro.

Sambar Vadai

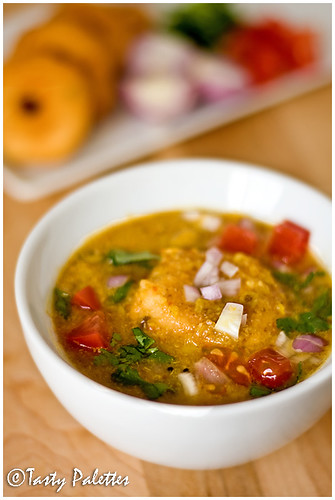
For serving sambar vadais, soak warm vadais in hot sambar for 2 minutes. Serve garnished with chopped raw onions, cilantro and tomato. No place for forks here, only spoons to scoop the drunken vada.

TECHNORATI TAGS: , , , , ,

Japanese Udon - Tofu Soup

When I am down with cold or fever, I generally resort to a set of recipes that clears my nose. These recipes are easy on stomach, but not light on flavour; meant to kick start our system with a spicy jolt. Like spicy tomato soup/rasam, Pepper-cumin-garlic rasam, and now miso soup.

Japanese Udon - Tofu Soup

My love for miso is not new. Mellow, but salty, miso makes a great soup. The broth is infused with spicy ginger and fragrant lemongrass and the noodles and tofu are let to soak up the flavour. I made up this recipe according to my tastes; feel free to modify it by adding mushrooms or mixed vegetables.

Ingredients

Silken tofu – ¾ cup, cubed
Dried or frozen udon noodles – 8 oz
White miso – 2 tbsp
Better Than Bouillon – 1tbsp
Ginger – 4 thinly sliced rounds
Lemongrass – 2, sliced, soft light green parts only
Green chilli – 1 (optional)
Scallions – 1, thinly sliced

Shredded ginger for serving (optional)

Method

Boil 4 cups of water with miso, bouillon, ginger, lemongrass and chilli for about 5 minutes. When the flavors have infused well, remove and strain. Transfer the stock back to the sauce pan and bring to a boil. Add udon noodles and cook in the miso broth. When the noodles are almost cooked, add tofu cubes and allow the soup to gently simmer, for about a minute. Let the noodles to cook thoroughly. Ladle onto bowls and serve hot topped with scallions and shredded ginger on the side.

Japanese Udon - Tofu Soup

Tofu is a good vegan source of calcium. Japanese udon-tofu soup is my entry to Beautiful Bones, hosted by Susan of Food Blogga. Its an event focused on bringing awareness about osteoporosis.

TECHNORATI TAGS: , , , , ,

Melon Salad With Mint And Buddha’s Hand

After being stripped off all its zest for cupcakes and crème brûlée, I was left with a ‘naked’ Buddha’s Hand. As light and refreshing it was, I made a simple summer salad by combining it with mint and melon. Its an ageless combination, but in this salad, the lemon pieces can be bitten into, rather than tasting faintly in the background.

Melon Salad With Mint And Buddha’s Hand

Talking about background and props, this melon salad is plated on a beautiful Italian earthenware, gifted by a beloved friend of mine. Gorgeous, exquisite and intricately crafted, it made my heart skip a beat when I opened the package. In an ocean of anonymity, such kinships are one of the things I cherish about blogging. My heartfelt thanks, dear friend.

Ingredients

Honeydew melon – 2 cups, cubed
Buddha’s Hand citron – ½ cup, small dice
Strawberries – ½ cup, hulled
Mint – ½ cup, minced
Salt
Pepper

Method

Mix all the ingredients and let sit for 15 minutes before serving. Serve at room temperature.

Melon Salad With Mint And Buddha’s Hand

When I searched the internet for recipes with Buddha’s Hand citron, there were not many, unfortunately. Some even recommended using it as a centerpiece in coffee tables, rather than cooking with it. I was happy that I could enjoy this amazing fruit in more than one dishes, and not as an eye candy. This final installment of 1-in-3 – Buddha’s Hand Citron goes to Michelle at The Accidental Scientist, who is hosting HOTM – Herbs.

TECHNORATI TAGS: , , , ,

Buddha’s Hand Crème Brûlée

After I was thoroughly impressed with the citrus-y floral notes of Buddha’s Hand, I cannot shake the idea of using it in a custard, off my head. It was going to be either a flan, a brûlée, or a pudding. I was itching to use the new blow-torch I had recently bought. And, crème brûlée was the clear winner. Here is ‘2’ of 1-in-3 – Buddha’s Hand Citron.

Buddha’s Hand Crème Brûlée

Ingredients

Egg yolks – 4
Sugar – 1 tsp + 3 tbsp
Salt – 1/8 tsp
Half and half – 2 cups
Nonfat dry milk – ½ cup
Buddha’s Hand zest – 1 tsp

Sugar – 6 tbsp, for sprinkling over the top

Method

Preheat oven to 300F. Whisk egg yolks, 1 tsp of sugar and salt together and set aside.

In a medium pan, pour half-and-half, along with 3 tbsp of sugar, zest and dry milk. Whisk occasionally while the mixture gently heats. Heat until tiny bubbles form around the edge. Remove from heat and gradually whisk in the milk mixture to egg mixture. Mix thoroughly, strain and pour into 6 ramekins.

Place the ramekins in a large baking pan and pour enough hot water into the pan to come halfway up the sides of the ramekins. Bake for 45- 50 minutes or until the crème brûlée is just set, and the center wiggles when shaken. Remove ramekins from the water bath and cool at room temperature. Cover with plastic wrap and refrigerate overnight.

When ready to serve, spread evenly 1 tbsp of sugar on the top of each ramekin. Use a blow torch to caramelize the sugar evenly. Alternately, place the custard under a broiler to blister. Allow brûlée to sit for 2 minutes before serving.

Buddha’s Hand Crème Brûlée

As you can see, I am still learning to use the torch, but I was amused to watch the sugar crystals caramelize, right in front of my eyes. I am sending this to Helen at Tartelette, who is hosting Sugar High Fridays – Citrus this month. Jennifer of The Domestic Goodness is the creator of this event.

1-in-3 – Buddha’s Hand Citron

From octopus to orange, squash to Star Wars, I had more fun than you all did, coming up with names for that strange-looking-thingy I posted yesterday. Isn’t Imaginaaaation fun?

Buddha's Hand Citron

As you many of you have guessed, it is indeed a citrus; Buddha’s Hand Citron, to be exact. Believed to have originated from India, this citrus got its name for its ‘fingers’. The fruit has no juice or pulp, just peel and pith.

When I first spotted it at Whole Foods, I wasn’t sure what it was. It looked weird, smelt nice and was exorbitantly prized. However, I was hesitant to buy as I had no idea of what it was. Looking at my bewilderment, the floor manager voluntarily sliced one and offered me a sample; few actually. I was intrigued and impressed by its texture right away. The peel was crisp and the pith was ‘cloud-like’, with almost no bitterness. It also had its signature lemony and floral notes. The more I had, the more I wanted take one home. And this story has a happy ending. Did I mention it was exorbitantly prized? Ah! All in the name of blogging.

So now I have an exotic fruit lying in my refrigerator and I am clueless on how to deal with it. There was not much information or recipes on the internet. Though marmalade sounded like a straight-forward option for a citrus with neither pulp nor juice, I wanted something different. When have I stuck to a standard procedure? So I decided to use them in recipes that calls for lemon zest, 3 recipes to be exact. And, so here it is 1-in-3 – Buddha’s Hand.

Buddha's Hand Cupcakes

First stop, cupcakes. Adapted from this book, these cupcakes were dense, moist and tasty. I was surprised how a small amount of Buddha’s Hand zest made a difference. This is my entry to Kalyn's Weekend Herb Blogging, hosted this week by Cate of Sweetnicks.

Buddha’s Hand Low - Fat Cupcakes

Ingredients

All purpose flour – ¾ cup
Baking powder – 1 tsp
Baking soda – ¼ tsp
Salt – ¼ tsp
Butter – 2 tbsp
Sugar – 1/3 cup
Grated Buddha’s Hand zest or lemon zest – 1 tsp
Lemon juice – ¼ tsp
Egg whites – 2
Buttermilk – ½ cup

Method

Preheat oven to 350F. Line a muffin pan with liners. Sift flour, baking powder, baking soda and salt together.

In a big bowl cream butter and sugar until well mixed. Beat in zest, lemon juice, egg whites and buttermilk and whisk thoroughly. Gently fold in the dry ingredients and mix until just combined. Scoop batter into the prepared pans and bake for about 25 minutes. The cupcakes should be well-risen and a toothpick inserted in the center should come out clean. Let cupcakes cool in the pan for 5 minutes, transfer to a cooling rack and cool completely. If desired, frost ‘em with cream cheese frosting or serve as is. Yields about 8 medium sized cupcakes.

Cream Cheese Frosting

Beat equal portions of cream cheese and powdered sugar with Buddha’s Hand zest until fluffy. Frost cupcakes just before serving.

Buddha's Hand Cupcakes

I am off to a good start. Lets see where these goblin fingers take me next.

What Could This Be?

What Could This Be

Almond Pâté

Pâté is a spreadable mixture of chopped or ground meat, fat and seasonings, often served with toasts as a starter. It may be cooked in a pastry (Pâté en croûte), or in a mold (Pâté en terrine). But there is no meat in my pâté, but ground almonds. Sounds fabulous? What else do you expect from Tassajara?

We were head-over-heels in love with this spread, to say the least. G, who loves everything almond, has declared that this pâté should always be on hand for a quick fix, anytime. That says it all, I guess.

Almond Pâté

Ingredients

Onion – 1 cup, minced
Butter – 1 tbsp
Green chilli – 1, minced (optional)
Cumin powder – ½ tsp
Mixed herbs (I used parsley, chives and rosemary) – 2 tbsp, minced
Raw almonds – 1 cup
Bread crumbs – heaping ½ cup
Soy sauce – 1 tsp
Garlic – 1 clove, minced
Mayonnaise – 3 to 4 tbsp
Salt
Pepper
Lemon slices
Butter paper – to roll

Method

In a skillet over medium-low heat, lightly toast the bread crumbs. Transfer to a big bowl. In the same skillet, melt butter and sauté onions along with cumin powder and garlic. When the onions are soft, transfer to the bowl with breadcrumbs.

Grind almonds to a coarse meal, like rava or cornmeal. Add to breadcrumbs and onion. Also add fresh herbs, soy sauce, garlic, salt and pepper, and work with your fingers to bring it all together. Add mayonnaise 1 tbsp at a time, until the mixture holds together. Transfer the mixture to a butter paper and roll into a log. Cover well and refrigerate until ready to use.

Serve with toasts, lemon slices and tomatoes. Spread pate over a toast, squeeze lemon juice and top with a tomato.

This is my entry to Waiter, there is something in my… Dried fruits and nuts, hosted by Andrew of Spittoon Extra. Since this makes an excellent open-faced sandwich, I am also sending this to Anupama of Food-n-more, who is celebrating Sandwich Festival this month.

My latest post at The Daily Tiffin - Herbs: More Than Just A Garnish.

Simply Okra

Whenever I find small tender okra (or lady’s finger, as it is called in India), I make this dish. I first tasted this in my aunt’s house over a decade ago. Being an ardent okra lover, I fell in love at the very first bite. When we came back, I, along with my mom tried it with equally delicious results. But over the next few years it was lost from our kitchen. When I started cooking on my own, this dish was always in the back of my mind. It was the taste I could remember; not the recipe. I had to rekindle my mom’s memory and voila, there I was, relishing it once again.

Don’t be fooled by the simplicity of the dish. Crispy from toor dal and spicy from black pepper, this minimally spiced dish lets the okra shine through. Thats makes it one of my all-time favourites.

Since okra is used whole, use only tender pods. How to find out whether they are tender? Hold the pod in your hand and gently break the tip with your thumb. If the tip snaps instantly, the pod is young. If it is woodsy, fibrous and doesn't snap, its mature.

Okra stuffed and ready to be baked

Though the dish is originally prepared in a kadai or skillet, I bake them in the oven. Not only does it reduce the amount of oil used, I don’t have to baby sit the okra. But the stove-top version is equally delicious too.

Ingredients

Whole okra or lady’s finger – 1 lb (about 40 pieces)
Toor dal – ¼ cup
Whole black pepper – 1 tsp
Salt – 1 tsp + ½ tsp
Oil – to spray

Method

Grind toor dal, pepper and 1 tsp of salt to a coarse powder. Preheat oven to 375F. Line a baking sheet with foil.

Spice Mixture

Cut the top and end of the okra. Make a slit on one side and stuff with spice powder without breaking the pod. Arrange okra on the baking sheet and spray them with oil. Sprinkle rest of the salt and bake for 20 minutes. Turn the pods gently to the other side and bake for additional 5 minutes, or until they are slightly crispy . Let rest for 2 minutes before serving.

If cooking on stove-top, heat oil in a kadai or skillet and gently cook the stuffed okra with a sprinkle of salt, until done and toasty.

Stuffed Okra

Stuffed okra served with avocado rotis and tomato raita

Udon – Miso Bowl

Have you ever yearned to visit a place for months together and suddenly realized that you can actually make to it in a matter of hours? That precisely explains my sudden disappearance this past week. I am hoping to share this experience with you when time permits.

Coming to today’s recipe, this is yet another restaurant-inspired meal. I have this bad habit of recreating meals that I enjoy in any eatery, be it a local café or a fine diner. Why bad? Because I know how to make it at home, so why bother ordering it again? This practice reduced our eating out options, until I learnt to enjoy the dish even if I know how to prepare it. This is one such dish that I appreciate, no matter where it is prepared.

Frozen Udon Noodles With Mirin and White Miso

For this recipe, I have used frozen udon noodles, which are available at Oriental supermarkets. Frozen noodles have much shorter cooking time and are smooth and chewy. They come in blocks which are easier to store and use. Dried udon or soba noodles can be used in its place. Learn to make udon noodles at home from Lara.

Mirin is Japanese cooking wine. This light gold coloured liquid adds sweetness and flavour to the dish. There are two types of mirin – Hon Mirin, which contains 14% alcohol and Shin Mirin, that contains 1% alcohol. When cooked, the alcohol evaporates leaving behind concentrated flavours. Use mirin sparingly because the taste is strong.

Miso is a salty condiment used in Japanese cooking. It is prepared by fermenting soy beans, rice or barley with salt and koji(a mold culture), and are aged in wooden caskets. They are differentiated by factors like the type of grain used, how long they are aged etc. Red and white miso are the common varieties available. If you are not introduced to miso before, start with white miso, because it is milder and smoother than red miso. When stored properly in a refrigerator, it stays fresh for a year.

Ingredients

Frozen udon noodles – 2 blocks (about 8 oz)
Red onion – 1, sliced
Fresh spinach – 1 cup, chopped
Sambal oelek (fresh chilli paste) – 1 tsp
Grated ginger – 1 tsp
Garlic – 2 cloves, minced
Lemon juice – 1 tbsp
Sesame oil – 1 tbsp

Miso sauce

Miso – 2 tbsp
Mirin – ¼ cup
Rice vinegar – 2 tbsp
Water or stock – ¼ cup

Method

Cook udon noodles according to instructions. Drain, rinse and set aside. Combine all the ingredients for the miso sauce into a smooth mixture.

In a skillet or wok over medium-high heat, heat oil and sauté onion. When the onions have caramelized, reduce the heat, add ginger, garlic and spinach. Let the spinach wilt and add miso sauce. When the sauce bubbles vigorously, add cooked noodles. Toss to combine, squirt lemon juice and serve hot. No additional salt is required as miso is salty enough.

Udon Miso Bowl

On a different note, my Baked Portabella has won last month’s challenge of No Croutons Required, hosted by Lisa and Holler. Many thanks to the hosts and to those who voted for me.

No Croutons Required

Arundathi, Miss Bellevue, Namratha, Cynthia have awarded me with ‘Yummy Blog Award’.

Yummy Blog Award

I thank these ladies and pass the award to all food bloggers who expend their time and energy to enrich the food blogging community.