Chocolate Chews

As the last installment of the chocolate trilogy, I leave you with these chocolate chews. As the name suggests, these are more than cookies. When eaten warm, they taste more like brownies with so little fat. When eaten cold, they are soft and slightly chewy. With so much chocolate, they got to taste great. It took only about 15 minutes to get ‘em into the oven. This easy, but tasty cookie is my entry to Eat Christmas Cookies, hosted by Susan of Food Blogga.

Chocolate Chews

Ingredients

Semi sweet chocolate – ¾ cup
Butter – 1½ tbsp
Instant coffee – ½ tbsp
All purpose flour – ¼ cup
Brown sugar – ¼ cup
Egg – 1
Vanilla extract – 1 tsp
Baking powder – ¼ tsp
Salt – a pinch
Chocolate chips – ¼ cup

ECC+logo+2

Method

Preheat oven to 375F. Melt chocolate, butter and coffee together in a microwave and let it cool. Sift together flour, baking powder and salt.

In a separate bowl, beat sugar and egg together until thick. Whisk the melted chocolate into the egg mixture along with vanilla extract. Gently fold in the dry ingredients. And finally stir in the chocolate chips.

Drop heaped tablespoons of the dough onto a greased cookie sheet and bake for 15 to 19 minutes. The cookies cracks on top when they are done. Cool on a wire rack. This recipe yields 8 good sized cookies.

Chocolate Chews

Nuts Divine

That’s what I would describe my favourite chocolate as, Ferrero Rocher. Its crunchy and creamy, with the right amount of sweetness. Nuts are this month’s theme for Click. I thought, what better way to appreciate nuts than to dip them in chocolate. And that is exactly what Ferrero Rocher is. A hazelnut surrounded by chocolate cream, encapsulated in a crisp wafer sprinkled with chopped hazelnuts.

Ferrero Rocher

It is one of those rare occasions that I get to photograph to my heart’s content, without worrying about the results. That’s right, the lovely duo at Jugalbandi have honoured me by inviting to the judges panel. If you haven’t clicked your winning shot yet, hurry, you have only a week left.

Chocolate Crème Pots With Truffles

For some reason, certain food photographs that I have seen in other blogs, magazines or cookbooks gets stuck in my head like glue, until I try it out at least once. This recipe is inspired from one such photo. An adult chocolate creme that looks and tastes divine. What I liked the most about this dessert is, its neither thick like a pudding nor thin like a drink, but somewhere in between. As a true chocolate lover, I served this velvety dessert with home made chocolate truffles. Overall, this dessert is elegant and easy. Prepare the chocolate crème and truffles 2 days before, refrigerate them separately, bring 'em to room temperature and serve your guests. Now that’s easy entertaining.

Chocolate Creme With Truffles

As always, I like chocolate slightly bitter and so I have used dark chocolate. But feel free to use semi-sweet chocolate. Also, I noticed that when refrigerated for more than 3 days, the chocolate crème thickens like a pudding. Not that it alters the taste anyway. So serve this at room temperature or slightly warm. Likewise, refrigerate the truffles and serve at room temperature. This dessert is so easy that everything is put together using microwave oven. Adjust the cooking times to suit your microwave. Since chocolate is the star of this dessert, try using the best available quality chocolate.

This quite fits Stephanie of Happy Sorceress’ theme and I am sending my Chocolate Creme with Truffles to her Blog Party – Another Bite of Dessert. This is also my entry to My Favorite Things - Chocolate, hosted by Bindiya of In Love With Food.

Chocolate Crème

Ingredients

Dark chocolate – ½ cup
Heavy cream – ¼ cup
Low fat milk – ½ cup
Egg yolk – 1
Coffee liquor – 2 tsp

Method

Microwave cream and milk together for 3 minutes, until bubbles appear on the sides. Stir in the chocolate and coffee liquor. Stir until melted. Add egg yolk and mix vigorously. Microwave for 30 seconds. Stir once and microwave again for 30 more seconds. Pour into serving containers while warm. Cover with plastic wrap or foil to prevent the chocolate crème from forming a crust.

Chocolate Truffles

Ingredients

Semi sweet chocolate – ½ cup
Heavy cream – ¼ cup
Orange zest – ½ tsp
Chopped nuts and cocoa powder – for coating

Method

Microwave cream until bubbles appear on the sides, about a minute. Stir in the chocolate and the zest. Keep whisking until chocolate completely dissolves and glistens. Cover and refrigerate for 2 hours. When ready, scoop a tsp of the chocolate mixture, roll into a ball in the palm of your hands. Roll either over cocoa powder or chopped nuts. I have used pistachios.

When ready, top one truffle over chocolate crème and serve with dessert spoons. Leave additional truffles on the table and let the guests help themselves.

Chocolate Creme With Truffles

Later, I found adding a pinch of chilli powder/cayenne pepper to chocolate crème instead of liquor was over-the-top. After the initial sweetness of the chocolate, the chilli powder leaves a slight heat on the back of the throat.

If you don’t want to use egg yolk, use 1 tsp of corn flour in ¼ of water. Adding a tsp of butter to the crème will give it a silkier texture. I omitted it because between the heavy cream and the egg yolk, I felt there is enough calories already.

Acai

USDA advises consuming about 1 cup of berries each day to meet the recommended antioxidants daily intake. Reducing free radicals, slowing down cell-aging, reducing the risk of cancer are some of the benefits of regular intake of antioxidants. Hence I make sure I include ‘em in my diet. A handful of fresh or frozen berries in my fruit smoothie everyday takes care of it. Recently, I discovered a new kind of berry - Acai (pronounced Aa-sa-yee). What made it notable was its endless list of benefits.

Acai falls into the category of superfood. These are food categories that have significantly high levels of crucial nutrients and are recommended for a better health and quality of life. If I can get that kind of nutrition from nature, without higher calories and side effects, why wouldn’t I?

Acai

Acai berries are the fruit of Acai palm trees that grow in Amazon swamps and floodplains. Now, you don’t have to go that extent to get hold of these mighty berries. The pulp of these berries are sold frozen or powdered in many supermarkets. You can also find them in packaged smoothies, carbonated drinks, flavoured coconut water etc. I find frozen pulp easier to manage. All I have to do is to scoop a couple of spoons into the blender. But they are little bit on the expensive side when bought in small quantities. Recently, Costco has started carrying Sambazon Original Organic Acai pulp (labeled as sorbet) in three single pint containers. Easy to store, easy to use. Taste wise, as the package states, it is more of a rich berry flavour with hints of chocolate.

Acai and bananas are a top class combination. Acai topped with sliced bananas and chopped nuts is my favourite ‘ice cream’ sundae these days. But the real winner is Acai smoothie with banana and few chunks of honeydew melon. You have to taste it to believe it.

Acai Banana Smoothie

Cornmeal Crusted Tomato Tarts

Cornmeal Crusted Tomato Tarts

So I bought these new tartlet pans. Who can resist tarts after seeing Tartelette’s eye-popping creations. I couldn’t wait to create a fabulous tart. But all the recipes for the tart dough called for at least one stick of butter. As if there isn’t enough indulgence already (all in the name of holiday baking), I searched for a low-fat, more-sensible recipe. I landed on Ellie Krieger’s page. I like her recipes from her show Healthy Appetite. Instead of substituting full fat cream cheese with a low-fat one, she talks about portion control and other sensible ways of eating right. I have tried many of her recipes and am happy with every one of ‘em.

I used her recipe for making the crust, but made the filling with what I had on hand. The original recipe looks equally good, which I plan to try out some day. As said in the reviews, the crust is a bit dry and crumbly. With more butter, it may be one of those melt-in-your-mouth tarts. But, hey, am happy with the recipe as-is. Also, I have used marinated mushrooms from the olive bar, which already had garlic and red peppers. You may want to add these separately if you are using fresh mushrooms. I have used sun-dried tomato pesto, you can use any pesto you have on hand.

This is my first time baking tarts, and the lesson I learnt is, the filling shrinks a little bit after being baked. So its better to slightly overfill them. This recipe makes four 4-inch tartlets that serves two.

Cornmeal Crusted Tomato Tarts

Ingredients

Crust

Cornmeal – 2/3 cup
Whole wheat pastry flour – 1/3 cup
Butter – 2 tbsp
Vegetable oil – 2 tbsp
Salt – ¼ tsp
Water – 2 to 3 tbsp

Filling

Red onion – 1, small, sliced
Tomato – 2, firm and medium sized, thinly sliced
Marinated mushrooms with roasted red pepper and garlic – 1 cup
Mozzarella and/or Boursin cheese – ½ cup
Pesto – 4 tbsp
Basil – few leaves, shredded
Parmesan – 1 tbsp

Method

Pulse the first five ingredients in the food processor until the dough form pea sized lumps. Gradually add one tbsp of water at a time and pulse until everything comes together. The dough for the crust can also be done by hand. Transfer the dough onto a working surface and knead for 10 seconds. Divide the dough into four equal parts and press each portion onto a 4 inch tart pan. Transfer the tartlet pans onto a baking sheet, prick a few holes on the crust with a fork and bake for 10 minutes at 350F oven. Rotate the baking sheet and bake for additional 5 minutes. Remove and set aside.

Meanwhile, prepare the filling by sautéing red onions until brown. Sear any other thinly sliced vegetables, if using, on both sides, seasoned with salt and pepper. Slice the marinated mushrooms along with roasted red pepper and garlic. Shred mozzarella cheese.

Assemble the tart by brushing a tbsp of pesto at the bottom. Spread caramelized onions, mushrooms, garlic, red peppers, and other vegetables if any, one above the other. Sprinkle shredded mozzarella and/or Boursin. Place tomato slices on the top. Season with salt and pepper and bake at 350F for 20 minutes.

Take the tarts out and let it cool for 5 minutes. The edges pull away from the pan as they cool. Remove ‘em from the mold, grate parmesan over the tarts and garnish with basil. Serve warm with a side salad or flavoured yogurt.

Cornmeal Crusted Tomato Tarts

These mini tarts are on their way to The Mini Pie Revolution hosted by Karyn and Ann at The Mini Pie Revolution Headquarters. Ann, Thank you for graciously accepting my tartlets.

Individual Chocolate Cakes

Individual sized desserts are attractive, in my opinion. On the table or in a picture, they have an appeal that I find irresistible. They have their advantages too. You don’t have to share it with anyone and enjoy all by yourself. You can even go for a second helping saying that it was too small. At least that’s what I do.

There is a very good reason for this post today. An elation that is to be shared with something sweet. My entry was announced as one of the winners in this month’s DMBLGiT hosted by Zorra, for originality.

Egg In A Whisk IV

Of course, you all chose one of the photos in that series as a winner already. Many congratulations to all the other winners and many thanks to the judges.

Ingredients

Bittersweet chocolate – 4 oz (about ¾ cup)
Butter – 4 tbsp
Eggs – 4, separated
Sugar – 2/3 cup
Vanilla extract – 1 tsp
All purpose flour – 1 tbsp
Salt – ¼ tsp

Method

Melt chocolate and butter together in microwave or in a double boiler. Whip eggs yolks, sugar, vanilla and salt vigorously together for about 2 minutes, until well combined. Combine melted chocolate with the egg mixture. Whip egg whites until soft peaks form. Sprinkle flour over the chocolate-egg mixture and add the egg whites. Gently fold everything together until well combined. Butter and flour four ramekins and spoon the mixture into the ramekins. Bake at 450F oven for about 8 minutes, until the top is set. Serve warm or at room temperature with berries and whipped cream. Serves 4.

Individual Chocolate Cake

Lolo at VeganYumYum has a mouth-watering array of small sized desserts. I am a big fan of her creations. This is my entry for JFI-Chocolate, hosted by Deepz of Letz Cook. JFI is Indira's brainchild.

And I surrendered…

Kneading the dough

Its raining potato bread everywhere in the blogging world and the temptation was too much. I duly surrendered and set out to make bread from scratch, for the very first time. I have always wanted to try potato buttermilk rolls recipe from this book. So I combined this recipe with Tanna’s recipe and developed my own. The rolls were soft and chewy with a light tang from the yogurt. I am so glad I made ‘em. Served with soup or as a sandwich, potato buttermilk rolls were just right.

Potato Buttermilk Rolls

Ingredients

Russet potato – 2, medium
Yogurt – ½ cup
Yeast – 2 packets
Sugar – 1 tsp
Salt – 1½ tsp
Butter – 1 tbsp
Whole wheat flour – 1 cup
All purpose flour or maida – about 4 cups, plus extra for dusting

Method

Peel and dice potatoes and cook in 4 cups of water, until soft. Drain and reserve the cooking water. Mash the potatoes well and let it cool. When the potatoes are warm and not hot, combine with yogurt, 1 ½ cups of potato water, yeast. Leave for 5 minutes.

Making Potato Buttermilk Rolls

Add sugar, salt, butter, whole wheat flour and 2 cups of all purpose flour to the potato mixture. Mix well until combined. The dough will be very sticky. Turn it on to the counter and start kneading. Keep adding flour until the dough comes together, about 2 cups. Transfer the dough to a well oiled clean bowl. Cover and let rise for about an hour.

When doubled in size, punch the dough and knead again. Divide the dough into two and reserve one half. Shape the other half into 6 rolls onto a baking sheet, lined with parchment paper. Cover and let rise for about 25 minutes. Preheat the oven at 450F. Lightly flour the rolls and bake for 10 minutes. Reduce the oven temperature to 350F and bake for additional 20 minutes, until light brown. Cool on a wire rack.

Potato Buttermilk Rolls

Bhatura

After the dough was done, I feared that it may be too much for just the two of us. I reserved half of it and chose to worry about it later. When the later came and I still had no idea I was a little desperate. Then an idea struck. Anjali of Anna Parabrahma had left a comment on this post, saying that she once made bhature with bread dough. Considering that the ingredients for the rolls were almost the same as aloo bhatura (barring yeast), I decided to give it a try. The bhature were a huge hit. The leftovers were even better. With due credits to Anjali, here is the method for making bhature.

Method

Take the other half, and add equal amount of all-purpose flour. Knead well. Roll out thin small rounds and deep fry. Serve with your favourite curry.

Bhatura

I served mine with Ashwini’s Gobi ka kheema. I have been looking for this recipe for quite some time and this one is spot on. Ashwini, your recipe pleased our palettes just like your pictures delights our eyes.

Vegan Ventures Roundup

Phew! Hosting an event is not a simple task. This being the first time, I learnt quite a bit. I was also introduced to many blogs and bloggers. On the whole, it was a fantastic ride from the start, thanks to you all. I was hesitant about announcing Vegan Ventures, not sure how it will be received. But gracious bloggers, as you are, played along well to make this event a success. Bloggers from varying food groups participated with equal enthusiasm. And some of you (Asha, Siri, Sea, Nags, Meera, The Cooker, Sarah, Sia, Mansi, Rina, Latha & Lakshmi) even sent two entries each. A big ‘Thank You’ to all the participants for sending in a total of 56 entries.


Vegan Ventures Logo


Although we (myself and ‘G’) have been vegetarians all our life, the concept of Veganism is quite new to both of us. Up until recent times, we always had thought being Vegan was just about not consuming any dairy, meat or any animal based products. Boy were we wrong.

Veganism is a lifestyle, a choice, a pledge to live free of cruelty to other living organisms that inhabit this planet and to live in harmony with nature. The concept of Veganism does not stop at the table, but extends to every other aspect of our modern lifestyle ranging from cosmetics, medicines etc.

Being Vegan is not an easy task and cannot be taken lightly. It’s a lifestyle, so changes will need to be done gradually in small steps. Cruelty-free living can start at home and in small simple steps
  • Reducing consumption of dairy, meat & animal based products
  • Using products that are not tested on animals and those which are not harmful to the environment.

In today’s age, it may not be entirely possible to live 100% free of cruelty. Knowingly or unknowingly we all consume a variety of animal based or derived products. Accepting this fact and increasing our awareness lets us do the best we can. I hope that Vegan Ventures in its own small way, has contributed to spreading this awareness. It was also an opportunity for us to expand our knowledge and awareness of this unique lifestyle. For further reads follow these links – Living cruelty free, Factory farming, Vegan Society.

With that thought, I leave you with a gorgeous array of vegan recipes, each unique and different, as their creators. In addition to the 56 entries I received, you can find 8 of my entries too. The picture below will take you to the gallery.

Vegan Ventures Roundup


Entries at a glance

  1. Tasty Palettes – Mixed vegetables with coconut-black chickpea rice
  2. Aroma – Zucchini Bhaji
  3. Aroma – Brussels sprouts stir-fry
  4. Tasty Palettes – Marinated cauliflower in coconut-chickpea flour gravy
  5. Siri’s Corner – Thai rice and beans croquettes
  6. Nourish Me – Shallot and prune confit
  7. Culinary Bazaar – Bean noodles
  8. Siri’s Corner – Mixed vegetables dipped in tomato sauce
  9. Tasty Palettes – Thai croquettes
  10. Samaikalam Vaanga – Tomato soup
  11. Book Of Yum – Tofu quiche
  12. Tasty Palettes – Lemon poppy seeds cookies
  13. The Art And Science Of Food – An article about vegan gelatin and Sambai on peuga-ga
  14. My diverse Kitchen – Tomato chutney
  15. Book Of Yum – Twice baked spinach garlic stuffed potatoes
  16. For The Cook in Me – Kara kozhumbu and beans parippu usili
  17. Smita Serves You Right – Quiche and tell
  18. One Hot Stove - Chili and cornbread
  19. Habeas Brulee - Quince cranberry sorbet
  20. Cooking 4 All Seasons – Jahangiri
  21. Enjoy Indian Food – Methi na muthiya
  22. Never Trust A Skinny Cook – Tempe skewer
  23. Ranchikud , A Goan’s Kitchen - Batatyache kalvan
  24. Tasty Palettes – Oatmeal with dates and pistachios
  25. The Cooker – Chocolate cake
  26. Jugalbandi – Thai yellow curry with black rice and baked lotus root
  27. The Singing Chef – Mixed vegetable curry
  28. Meera’s Weblog – Sprouted green gram sabzi
  29. Red Chillies – Garden vegetables-navy bean soup
  30. Meera’s Weblog – White beans sabzi
  31. What Smells So Good – Slow it down Mediterranean soup
  32. What Smells So Good – Low fat coffee cake
  33. Monsoon Spice – Tome yum soup
  34. Monsoon Spice – Jasmine rice soup
  35. The ‘Yum’ Blog – Chocolate Truffles
  36. Tasty Palettes – Tofu Sandwich
  37. Zlamushka’s Spicy Kitchen – Chili brownie muffins
  38. Spice ‘n Flavours – Baigan ka bhurr-taah
  39. Canela & Comino - Moroccan garbanzo soup
  40. Curry In Kadai – Ridge gourd in spicy tamarind sauce
  41. Tasty Palettes – Taco party
  42. Spicy Chilly – Stir-fried green papaya
  43. Fun And Food – Rice paper rolls
  44. Fun And Food – Hot and sour soup
  45. Food, In The Main… - Amiri khaman
  46. Evolving Tastes – Oven cooked baby potatoes in tomato gravy
  47. Ahaar - Slow cooker black bean and vegetable soup
  48. Vegan Visitor - Roasted chestnut and persimmon stuffing
  49. The Cooker – Nankatai
  50. Sunita’s World – Split red lentil soup
  51. Valli’s Kitchen – Quinoa with asparagus and chickpeas
  52. Indian Food Rocks – Udon noodle curry
  53. Fusion – Soya lollipops
  54. The ‘Yum’ Blog – Thalara karamedu
  55. Greedy Gourmet - French bean, tomato and pistachio salad
  56. Rina’s recipe – A simple toor dal and a vegan meal
  57. The Well Seasoned Cook – Indian Fried Okra
  58. Global Vegan – Rice kheer
  59. Finger Licking Good – Spicy Dosas
  60. Hunger Pangs – Get vegasconed
  61. Veggie Platter – Peanut butter
  62. Tasty Palettes – Vegetable potstickers
  63. Cooking From A To Z – Almond orange chocolate cake
  64. Mediterranean Cooking In Alaska - Wild greens with celery-mint tomato sauce

The entries are in the order in which I received them. If you don’t find your entry or is there a correction to be made, please let me know, I will rectify it. For quick reference, the event logo on the left pane will bring you to this roundup on your future visits.

Vegetable Potstickers

Vegetable Potstickers

When given an option between steamed or pan-fried dumplings a.k.a potstickers, I always go for the pan-fried ones. They stick to the pan while cooking, and hence the name. Contrary to the term fried, they are not that fatty. For an extra spritz of oil, the dumplings are crunchy on one side, adding a new dimension. Having said that I still like steamed dumplings. This is just for a change.

Since there is not a whole lot of flavour going on with the wrapper, I kept the filling fresh and crunchy. The veggies are barely sautéed, and the cabbage is added at the last minute. The residual heat is just enough to cook it. The filling is mildly seasoned and hence the flavour comes from the veggies only.

They look and taste delicious and you can gulp down a dozen of ‘em in one sitting. But this is not one of those recipes that you do when it is almost meal time. It requires some planning and assembling, because shaping the dumplings takes some time. You can definitely make ahead and freeze ‘em and cook just before serving.

Ingredients

Cabbage – 2 cups, shredded
Carrot – 1 cup, shredded
Bell pepper – 1 big, shredded
Green chilli – 1, minced
Ginger – 1 inch, grated
Lemon grass – 1 tbsp, grated
Soy sauce – 2 tbsp
Salt
Pepper
Sesame oil – 1 tbsp
Wonton wrappers – 1 packet

Vegetable Potstickers

Method

Reserve some shredded cabbage, carrots and bell pepper for plating. Put a wok on high heat. Add oil and quickly stir fry carrot, bell pepper with green chilli, ginger and lemon grass, for about a minute. Season with soy sauce, salt and pepper. Switch off the flame and mix the shredded cabbage. Mix thoroughly and set aside.

Take 6 wonton wrappers at a time and form an assembly line. Brush the edges with water, place a tbsp of filling in the center, and fold as a square or a triangle. Pinch the edges and transfer the finished wontons onto a baking sheet and keep them covered with a kitchen towel. Proceed to finish the rest.

Take a flat pan with lid and put it under medium heat. Spray the pan with a tsp of oil and place 5 or 6 filled wontons without crowding the pan. Don’t disturb the potstickers for a whole minute. After they have crisped on one side, gently pour ¼ cup of water in the pan and close the lid. The steam from the evaporating water will cook the potstickers. When all the water has dried and the wonton wrappers are transparent, they are done. Gently transfer onto a platter prepared with the reserved vegetables and serve immediately with your favourite dipping sauce.

If you would like to send in your entries for Vegan Ventures, hurry up, there is only a day left for submission.

Vegan Ventures Logo

Taco Party

Who said a party always means lot of people and loads of dishes? Few weeks back we had a taco party, on a weekday, just the two of us. I spiced up a so-so meal into a celebration. Celebration of… well, nothing; barely making through the work week. Though it may sound crazy, it did lighten our spirits. No dishing out dinner course after course, no trouble getting dressed and looking civilized. A casual party in our PJs did make us feel ‘special’. It worked out so well that I am planning to do it more often.

It is totally stress free and you can prepare whatever you are in the mood for. This can be served for 2 or 20. You can make it vegan or vegetarian. It can be healthy or indulgent. Towards the end, I even gathered everything in one bowl, crushed few taco shells and made myself a big bowl of salad; crunchy, tasty and bold. Well, you get the idea.

Taco Party

1. Refried beans

Ingredients

Pinto beans – 1 can, drained and rinsed
Onion – 1/2 , chopped
Bell pepper – 1/2 , chopped
Tomato paste – 1 tbsp
Garlic – 2 cloves, minced
Cumin powder – 1 tsp
Chipotle chili (in adobo) – 1, minced
Adobo sauce – ½ tsp
Oregano – 1 tsp
Salt
Oil

Method

Chipotle in adobo sauce is available in small cans. Chipotle is smoked jalapeno and is sold in a preserve called adobo sauce, which is ketchup, vinegar and other seasoning depending on the brand. I have used the adobo sauce for heat, omit if you cannot handle much heat.

Heat oil and sauté onion and bell pepper until soft. Add all other ingredients with ½ cup of water and bring it to a boil. Simmer until everything comes together.

2. Pico De Gallo

Ingredients

Ripe tomatoes – 3, seeded and chopped
Red onions – ¼, chopped
Jalapeno – 1, minced, seeded if desired
Cilantro – a handful, chopped
Juice of a lemon
Salt

Method

Mix all of the above and let it sit for the flavours to develop.

3. Nupur’s Salsa Verde

Follow the recipe blindfolded. It works every single time.

4. Shredded Lettuce and Taco Shells

Shred lettuce as needed. Slightly warm the taco shells by microwaving 'em for 30 seconds. Use tortillas for soft tacos or fajita party.

Taco Party

For more ideas visit Nupur’s taco party.

Tofu Sandwich

I am not fussy about eating raw tofu. It is bland, but I compensate for it by marinating in a flavourful marinade. This recipe, which is inspired from Tassajara, impressed me, partly because it calls for so many vegetables and partly because it is so darn simple.

Tofu Sandwich

Even if you are a tofu hater, you will love this, because you cannot taste the tofu; well, almost. The tofu, when let to sit for 30 or more minutes, keeps absorbing all the flavours. The leftovers are even better. You can have it as such as a cold salad or make a sandwich. Since it gets better with time, this is an ideal lunch box mate. If your bread is not crusty, toast it lightly to avoid a soggy sandwich.

Ingredients

Firm tofu – 1 lb
Red bell pepper – ¼ cup, finely diced
Celery – ¼ cup, finely diced
Carrot – ¼ cup, finely diced
Red onions – 2 tbsp, minced
Scallions – 2, both green and white parts, finely chopped
Any mixed herbs like mint, cilantro, thyme, parsley – 2 tbsp
Ginger – 1 tsp, grated
Green chilli – 1, minced

Dressing

Sesame oil – 4 tbsp
Dijon mustard – 1 tbsp
Red wine vinegar – 1 tsp
Soy sauce – 1 tbsp
Salt
Pepper

Method

Take all the dressing ingredients in a large bowl and whisk vigorously to combine.

Crumble the tofu block and place it in a clean dry kitchen towel, bring the ends together and squeeze to remove all the water. Add this to the dressing. Add all the vegetables, herbs, ginger, green chilli and lightly mix with a fork. Let it sit for about 15-20 minutes. Serve as a cold salad or spread on a crusty bread and skewer with a toothpick for a sandwich.

Tofu Sandwich

Roasted Chestnuts

I was away from blogging for a week now, but it sure does feel like a long time. Friends visit and an unexpected jaunt are to be blamed at. I did miss participating in few events, but I hope to make up for it with regular posts hereafter.

I have never laid hands on chestnuts so far. But I have longingly looked at Indira devouring them year after year. This year I was lucky to find them at Whole Foods. They were $8 a pound. Ah, what the heck. All in the name of blogging.

Chestnuts Ready To Be Roasted

I roasted them like I did jackfruit seeds. But you will have to mark an ‘x’ at the top of the nut, helping steam to escape while roasting. Slowly roast ‘em on a cast iron pan, until the outer layer is dark brown in colour. The shell gently opens like a flower, as they heat through. Let it cool down a bit and enjoy ‘em while they are still warm. I was pleasantly surprised that they tasted more like jackfruit seeds, but moist and subtly sweet. The flesh was smooth and soft.

Roasted Chestnuts

I hope to find more of ‘em throughout this winter and I would be glad to find out any recipes using chestnuts. I should thank Indira for alluring me toward these humble, yet delicious nuts, which, otherwise, would not have drawn my attention with their unassuming looks. I hope you would pay a second look next time you find ‘em at your grocery store or when a roadside vendor is roasting ‘em on an open fire.

Starting The Day Right

You all know how I whine over eating the blah oatmeal for breakfast. But, over time, to my surprise, I happen to appreciate it. With mercury falling day-by-day, I am not up for cold cereal either. There is no denial that oatmeal is, by far, one of the healthiest breakfast you can have. “What cannot be cured must be endured”, says my dad. So, instead of whining, I decided to dress it up, making breakfast a treat, than a chore.

Being vegan or not, I love soy milk with my cereal or oatmeal. It lends a sweet flavour without the cholesterol. But if soy milk is not your thing, you can use regular milk. I perk it up by adding a dry fruit and a nut and/or seed. Dried berries, raisins would work too. Try unsalted, roasted pepitas, for something different. Since I decided to make one of my favourite combinations today, which is dates and pistachios, I am sending this to Chandrika’s AFAM – Dates.

Ingredients

Quick cooking oats – 6 tbsp
Water – 1 cup
Soymilk – ½ cup
Flax seeds – 1 tbsp
Dates – 10, pitted and chopped fine
Pistachios – ¼ cup, finely chopped

Method

Bring water to a boil. Add oats and cook until soft, about 3 minutes. Add flax seeds, switch off the flame and add soymilk. Garnish with dates and pistachios and serve warm.

IMG_1199

Vegan Lemon Poppy Seed Cookies

Being vegan doesn’t mean there is no indulgence. Craving for a snack one evening, I came across these cookies. They were originally shortbread, but I reduced the fat almost by half and made them into cookies. I love lemon poppy seed muffins, no wonder I loved these cookies too. Lemon in cookies is very interesting and the poppy seeds are mildly crunchy at the back of your mouth. These cookies are a keeper.

Vegan Lemon Poppy Seed Cookies

Ingredients

Unbleached all purpose flour – 1 cup
Poppy seeds – 1½ tbsp
Corn flour – 1½ tbsp
Nutmeg – 1/8 tsp
Salt – 1/8 tsp
Margarine – 5 tbsp
Sugar – 1/3 cup
Lemon juice – 1 tbsp
Lemon zest – 1 tbsp
Vanilla – 1 tsp
Water – 3 tbsp

Method

Preheat the oven to 375F. Mix flour, poppy seeds, corn flour, nutmeg and salt together. In a separate bowl, cream margarine, sugar, lemon juice, zest and vanilla together. Add the flour mixture to the margarine mixture and mix lightly. Sprinkle 1 tbsp of water at a time and knead very lightly till the dough comes together. Don’t add water more than necessary.

Line a baking sheet with silicone sheet or spray with a nonstick spray. Pinch a tbsp of dough, form a ball and lightly press flat. Bake until the edges are lightly brown, about 18-20 minutes. Cool on a wire rack and store in an air tight container. This yields about 13 cookies. Recipe adapted from Tassajara.

Vegan Lemon Poppy Seed Cookies

Saving Thai Croquettes

One of my favourite bloggers, Susan of Fat Free Vegan Kitchen, invited fellow bloggers to help her save a recipe. November being Vegan month at Tasty Palettes, I couldn’t ask for a better reason to participate. The croquettes being Thai flavoured were also part of the reason for my interest.

When I say Thai, these flavours come to my mind – vegetables, spices and coconut. I improvised the recipe to include all these aspects. Sweet corn tastes great in most of the savoury cake recipes I have come across. So that was to be one of my special ingredients.

After mixing the ingredients, I realised the need for starch. And I quickly microwaved a sweet potato. And the batter was fairly sweet, hence I omitted any sweetener altogether. I was almost done and still had not added coconut milk yet, and the mixture was already moist. Debating over whether to add fresh or desiccated coconut flakes, I decided to go with the drier kind, as there was enough moisture in the batter.

Even though Susan bakes her croquettes, I pan fried them with a quick spray of olive oil. Well, I was not only running late for dinner but hungry too. The croquettes were quite forgiving. They were easy to flip without any additional oil. Now you don’t have to worry about those additional calories.

And it was perfect. The corn (I used fresh) was plump and sweet, and the lightly toasty coconut flakes added a mild, but pleasant aroma in the background. Though tomatoes were added as a garnish for their colour, I should say, they are a must, for the burst of freshness they provided complimented the croquettes. Next time, I wouldn’t even mind pulsing the corn, I would add them whole.

Thai Croquettes

Ingredients

Green beans – 1½ cup, chopped
Corn – 1½ cup, fresh or frozen
Sweet potato – 1, medium sized
Red curry paste – 1½ tbsp
Basil leaves – a handful, chopped
Lemon zest – 1 tbsp
Soy sauce – 3 tbsp
Ground flax seed – 1 tbsp
Desiccated coconut – 2 tbsp
Corn flour – 4 tbsp
Salt
Pepper

Method

Blanch green beans or cook them in the microwave for about 6 minutes, until they are half done, but still crunchy. Let the beans cool down a bit and pulse ‘em in a food processor along with corn, 2 or 3 times. Take care the vegetables don’t get mushy. Transfer to a big bowl.

Wash the sweet potato. Pierce them several times with a fork. Microwave for 4 minutes. Turn the sweet potato over and cook for 4 more minutes. Slit the skin and scoop the flesh out in to the bowl with green beans and corn. Add rest of the ingredients into the bowl. Mix well and form patties.

Spray oil over a flat pan and put it on a medium heat. Neatly arrange the patties and cook for about 3 minutes. Flip and cook the other side for another 2 minutes. Garnish with thinly cut scallions and chopped tomatoes. Serve with a dipping sauce.

Thai Croquettes

Susan, I hope I saved your recipe rightly. This is my entry for Can This Recipe Be Saved?

Last, but definitely not least, my Soba noodles entry, for this month’s DMBLGiT, hosted by Jennifer of Bake or Break has been awarded for its originality.

Soba Noodles

Gallery here and winners announced here. My sincere Thanks to all the judges and Congrats to other winners.

Marinated Cauliflower In Coconut-Chickpea Flour Gravy

I was looking for an elegant one-plate dish, and came across this marinated chicken recipe. The gravy was what caught my attention, and I duly veganised it. Boy, the taste knocked my socks off. The gravy was smooth and creamy. I used homemade coconut milk, as I find the store bought ones to be excessively creamy. The chickpea flour, instead of the usual, but bland corn flour, added a subtle flavour. I am going to try this technique for other gravies too. There is nothing I would change in this recipe except, making a double batch next time.

Marinated Cauliflower In Coconut-Chickpea flour Gravy

Ingredients

Roasted Cauliflower

Cauliflower – 1, big, cut into large florets
Chilli powder – ½ tsp
Olive oil – 1 tbsp
Lemon juice – 1 tbsp
Salt

Coconut-Chickpea Flour Gravy

Onion - 2, small, sliced
Green chilli – 2, minced
Garlic – 4 cloves, minced
Tomato – 2, cubed
Coriander powder – 1 tbsp
Cumin powder – 1 tsp
Turmeric powder – 1 tsp
Chilli powder – ½ tsp
Cinnamon stick – 1 inch
Chickpea flour/besan – 3 tbsp
Coconut milk – 1 cup if homemade, 2/3 cup if store bought
Oil
Salt

Method

Soak cauliflower florets in salted hot water for 5 minutes. The florets not only get cleaned but softened. Drain well. Prepare the marinade by mixing oil, lemon juice, chilli powder and salt in a large bowl. Add the florets and coat well in the marinade. Leave it aside for 15 minutes.

If you are making coconut milk at home, soak 2/3 cup of grated coconut in 1 cup of warm water for 10 minutes. Put this in a blender and grind to a smooth mixture. Drain this mixture using a cheese cloth. Extract as much milk as possible. Discard the pulp and reserve the milk.

Preheat the oven to 400F. Line a baking sheet with foil. After the florets have marinated for 15 minutes, arrange each floret separately on the baking sheet. Bake for about 25-30 minutes, until the florets have cooked and browned toward the edges. Carefully remove the florets from the baking sheet and set aside.

For the gravy, heat oil in a sauce pan and sauté onions till light brown. Add green chilli and garlic and brown for additional couple of minutes. Stir in tomatoes, dry masalas (cumin, coriander, chilli, turmeric), cinnamon stick and salt. Cook on medium low heat, until tomatoes are soft and the spices are not raw, about 5 minutes.

Dissolve chickpea flour in 3 cups of water, without any lumps and add to the onion+tomato mixture. Bring this to a boil, reduce the heat and simmer for 15 minutes. The gravy will thicken as it boils. Stir in coconut milk and heat through.

Plate the gravy with roasted cauliflower florets on top. I served mine with brown rice.

Marinated Cauliflower In Coconut-Chickpea flour Gravy

Marinade cauliflower with 2 tbsp of yogurt instead of oil+lemon juice, for a vegetarian version. Recipe heavily adapted from Vij’s.

Vegan Ventures

You all know Tasty Palettes is going vegan this month, mainly to keep track of vegan recipes for my cooking repertoire. But after seeing Asha’s comment about making this an one-time event, I thought ‘Why not?’. It may be difficult to go vegan for a month even if you are a vegetarian. But we all have recipes that are tasty, healthy and most importantly, vegan. Pooling those recipes in one place would be of immense help to our vegan friends, would-be vegans and on-and-off vegans like me (if there is one!). Hence I invite you all to participate in this one-off event ‘Vegan Ventures’.

Here are the guidelines:

  1. Vegan recipes in Indian cuisine are aplenty. From everyday dal to simple pulao, those simple and easy recipes are perfectly vegan. But try something new, a vegan recipe that you have been wanting to try, a recipe that you would entertain your vegan friends with. Refreshing vegetables, interesting vegan substitutes, chic desserts, well, you get the idea.
  2. Any information and ideas on vegan living are wholly welcome.
  3. Please make your entries special by creating especially for this event.
  4. Feel free to use the logo.
  5. Include a link back to this post.
  6. Send your entries by November 30, 2007 to tastypalettes@gmail.com with the subject ‘Vegan Ventures’. Include your name, your blog’s name, the permalink of the entry, a picture of your gorgeous recipe (if any) in your email.
  7. You don’t have a blog? No worries. Send your entries with a picture to tastypalettes@gmail.com.
  8. I will post the round-up during the first week of December 07.

Vegan Ventures Logo

If you are new to veganism, these are the don’ts.

  • Any kind of meat or seafood
  • Dairy products – milk, yogurt, butter, cheese etc
  • Egg
  • Honey
  • Gelatin
  • Any other animal products or derivatives

And these are the dos.

  • Vegetables
  • Fruits
  • Grains
  • Beans, legumes, lentils
  • Nuts
  • Seeds
  • Soy products like tofu, tempeh, miso, seitan.
  • Non-dairy milks like soy milk, rice milk, almond milk, coconut milk.
  • Sweeteners like agave nectar, maple syrup. I am going to allow sugar, as vegan dry sweeteners are not accessible to everyone.

Please feel free to add/correct these lists as I am new to Veganism too. Here are some vegan resources – List of vegan foods, vegan.org.

Event roundup here.

Mixed Vegetables with Coconut-Black Chickpea Rice

November is Vegan Month. Veganism is not just a diet, but a philosophy of cruelty-free lifestyle. For health/environmental/ethical reasons, some of us choose not to consume animal products. From eggs or dairy at the dinner table to fur or leather in the living rooms, there are so many don’ts in the life of a vegan.

I have almost been a vegan for about four months for health reasons. Almost, except for a cup of coffee everyday. I was energetic through out the day, without any afternoon energy slumps. Best of all, I felt good inside out. And then came the holiday season and a vacation. There ends my vegan story. But this month, Tasty Palettes is going vegan. I have decided to record few of the vegan recipes that I learnt and any new recipes I try as an aid for me and all those vegan out there.

I start with a delicious recipe from an equally delightful cookbook – Vij’s Elegant and Inspired Indian Cuisine. Written by a restaurateur, the recipes appeal to cooks, both novice and expert in Indian cuisine. I am very happy with every one of the recipes I have tried from it so far.

Mixed Vegetables with Coconut-Chickpea Rice

The vegetables called for, in this recipe were unique. Hearty potatoes, tart tomato and sweet delicious corn, served with coconut-chickpea rice, was delicious enough to make this over and over again. I have slightly adapted the recipe according to my liking. The recipe calls for red cabbage, though radicchio works equally well.

Ingredients

Rice

Black chickpeas – ½ cup
Grated coconut – 3 tbsp
Basmati rice – 1 cup
Mustard seeds – ½ tsp
Curry leaves – few
Oil – 1 tsp
Salt

Vegetables

Green cabbage – 1 cup, cut into thick long strips
Red cabbage – 1 cup, cut into thick long strips
Potato – 2, cut into thin half moons
Corn, fresh or frozen – 1 cup
Tomato – 1, finely chopped
Mustard seeds – ½ tsp
Cumin seeds – 1 tsp
Kalonji seeds – 1 tsp
Coriander powder – 1 tbsp
Red chilli powder – ½ tsp
Oil – 1 tsp
Lemon juice
Salt

Method

Soak chickpeas overnight in 2 cups of water and ¼ tsp of salt. Next morning, drain chickpeas and pressure cook until three whistles without adding water. Cook rice with a cup of water. Fluff and cool the rice till each grain is separate. In a kadai or skillet, heat oil, splutter mustard seeds. Add curry leaves and coconut and toast for a minute. Add the cooled rice, chickpeas and salt. Combine thoroughly. Keep warm.

For the vegetables, heat oil in a separate pan. Add mustard, kalonji and cumin seeds, and allow them to splutter. To this, add tomatoes, coriander powder, red chilli powder and salt. Sauté until tomatoes are pulpy. Add sliced potatoes, and cook for 4 minutes, sprinkling water if necessary. Finally add corn, green and red cabbage and stir for 2-3 minutes. The vegetables should be slightly cooked, but crunchy. Remove from heat and stir in lemon juice.

Place rice in a bowl and spoon the vegetables over top and serve.

Mixed Vegetables with Coconut-Chickpea Rice

Adai and Avial

Tamil Nadu and Kerala, being neighbours, share quite a few recipes. Avial being one of them. Though it tastes excellent with rice, I find Adai-Avial combination, quite enticing.

Avial (Mixed Vegetable Stew)

Avial essentially means ‘to be cooked’. Colloquially, it also refers to a mixture of anything and everything. And that is the idea. Any seasonal vegetable other than okra, bitter gourd and colocasia (arbi) can be used. Drumsticks are a favourite candidate due to their aroma. This can be had with rice/sambar/thogayal or adai. Though avial tastes better when fresh, it keeps well for 2 days in the refrigerator, without yogurt. Add yogurt only to the portion that is to be served. This celebration of vegetables is my entry to Vegetarian Awareness Month, hosted by Margot of Coffee and Vanilla.

Vegetables for Avial
Left to right, Top: Plantains, Green beans, White pumpkin
Bottom: Green chillies, Curry leaves, Carrot, Peas, Potato

Ingredients

Any vegetables cut into thick matchsticks – 3 cups
Grated coconut – ½ cup
Green chillies – 3
Curry leaves - few
Yogurt – ½ cup
Salt
Coconut oil – a tbsp

Method

Cook all vegetables until done. This can be done using microwave oven or over stove top. They should not be mushy, but slightly crisp on the inside. Grind coconut and green chillies to a fine paste and add to the cooked vegetables along with salt and curry leaves. Gently heat vegetables along with the ground paste until green chillies do not smell raw, about 3 minutes. Take care not to mush the vegetables while mixing. Just before serving, combine yogurt and a tbsp of warm coconut oil to avial and serve.

Avial

Adai (Lentil Pancake)

Avial goes very well with paruppu usili. But the eternal combination is Adai-Avial, which can be seen served even today in many of the South-Indian restaurants. Hearty lentils combined with sweet vegetables and cool yogurt compliment each other.

Ingredients

Par boiled rice – 2 cups
At least 2 types of dal(toor dal, chana dal, urad dal) – 1 cup, combined
Red chillies – 6 or 8
Asafoetida – ½ tsp
Salt
Curry leaves - few
Red onions – 1, medium, chopped finely
Oil

Method

Soak rice and dal mixture separately for at least 2 hours. Grind rice along with red chillies, salt and asafoetida to a coarse meal. Then pulse the dal mixture, barely grinding them. Mix them both along with curry leaves. The batter will be quite thick.

Heat a tawa or griddle. Place some batter in the tawa and spread them to form a circle. Make a dent in the center. Top the batter with chopped onions. Drizzle oil around the adai and in the center. Cook this over medium heat. Flip to cook the other side. Serve with avial, idli podi, butter and jaggery.

Adai and Avial

Few things to be considered are
  1. You can use raw rice instead of par boiled rice
  2. For a crisper adai, do not grind dal to a fine paste. The bigger the better. You can even add a handful of soaked chana dal to the final batter for extra crispiness.
  3. Onions can be topped or mixed into the batter. Cabbage, drumstick leaves are the other usual toppings.
  4. As another variation, omit onion/cabbage and mix a handful of grated coconut to the batter. The adai will be softer.

Amish Pancakes

I love pancakes! Who doesn’t? They are easy and versatile. Served with a seasonal fruit, they are one of my favourite brunch ideas. I make ‘em in bulk and freeze ahead, to devour on those mornings when I crave for a warm breakfast.

The Amish starter was a perfect base to fluffy and tasty pancakes. The holes in the pancake speak for itself. I enjoyed every bite of it that I am happy to share this as the final installment of 1-in-3 Amish Friendship Starter. I developed this recipe according my preference. Feel free to alter to suit your taste. A handful of flax seeds or chopped walnuts will be a nice addition.

Ingredients

Starter – 1 cup
Flour – 2 cups
Baking powder – ¼ tsp
Baking soda – 1 tsp
Salt – ¼ tsp
Eggs – 2
Milk – 1 cup

Method

Mix all of the above just until combined, without over mixing. Heat a pan or griddle and pour ¼ cup at a time. Brown both sides and serve with your favourite condiments.

Amish Pancakes
Amish pancakes served with orange sauce.

Amish Friendship Loaf

Almost all the bread recipes with Amish friendship starter I have looked up, calls for instant pudding mix in addition to other flavouring agents. Since making naan, I knew the starter tastes good when cooked as such. So why not make an ordinary loaf of bread? Hence born the second idea for 1-in-3 Amish Friendship Starter.

The measurements given below yield one small loaf that got over between the two of us, when I served with afternoon coffee. Thanks to Cynthia for your handy dandy tips on baking this bread.

Ingredients

Amish friendship starter – 1 cup
Whole wheat bread flour – 1 cup
Yeast – ¼ tsp
Salt – 1 tsp
Oil – 1 tsp
Cornmeal – 1 tbsp

Method

Mix the first four ingredients to form a tight dough. Place this in an oiled bowl and cover with a damp cloth. Keep this in a dark warm place for 20 hours. Punch down and knead the dough well. Shape into a loaf, cover with a damp cloth and let it rise again, for 2 hours. When ready, preheat the oven to 450F and put a cast iron pan/pot in the oven as it preheats. After 20 minutes, carefully remove the pan/pot. Line the inside with a parchment paper, sprinkle cornmeal and place the shaped dough on the parchment paper. This will ensure that the bread doesn’t get burnt. Cover the whole pan with foil and bake for 25-30 minutes. The bread is done when it sounds hollow when tapped. Cool, slice and serve with coffee.

Amish Friendship Loaf

Friendship loaf served with Indian style filter coffee and blueberry preserve.

As you may all know by now, my entry “Eggs…Through My Lenses” has been awarded the Click’s Reader’s Choice Award, hosted by Jai & Bee of Jugalbandi. The reason I got this award is you, my dear readers. I am grateful for your support and a bunch of Thanks for those who voted for me (and those who didn’t too ;) ). My hearty congratulations to other winners Sunita, Manisha and Andrew. Hosting and judging the entries should have been a monstrous job, but it’s a job well done Jai, Bee, Meeta and Jaden. Kudos!

1-in-3 Amish Friendship Starter

When Nupur sent me that sour-sweet smelling package, I meticulously followed the tradition and baked Pineapple-Cherry Bread. But after working with the starter and understanding how to use it, rather manipulate it, opened a door of opportunities, or recipes, I should say. This 1-in-3 series is about my experiments with the starter.

I am not going to give instructions on how to feed the starter. You can find it here, along with other recipe ideas. If you are looking to make the starter on your own, this recipe may be of help. But I cannot vouch for the recipe as I haven’t tried it.

With many thanks to Nupur for sending me the starter, here is 1-in-3 Amish Friendship Starter.

Garlic-Herb Naan

Most of the recipes I develop are by intuition. Things I strongly believe will work, even though I am trying it for the first time. After observing the active starter, one thought that screamed inside my head was flat bread. Unsure, I set out to make Naan, the Indian flat bread, to be on the safer side. I had no reason to be unsure. The naans were A-Class.

Garlic Herb Naan

Ingredients

Amish friendship starter – 1 cup
Whole wheat flour – about 1¼ cups
Salt – 1 tsp
Garlic – 1 clove, minced
Mint, cilantro – 1 tbsp, finely chopped
Oil – 1 tbsp

Method

Combine starter, salt and flour to form a stiff dough. Add more flour depending on the moisture in the dough. Cover and rest the dough for 6-8 hours. When the dough has risen, punch down, knead well, cover and rest for another 2 hours.

When ready, preheat the broiler. In a small bowl, combine garlic, herb and oil and keep ready. Pinch an orange sized dough, and roll into a tear shape. Place on a hot pan, and cook until both the sides develop light brown spots. Transfer the naans on to a cookie sheet and broil until dark brown spots develop, about 30 – 45 seconds. Brush naans with garlic oil when they are hot out of the oven. Serve with your favourite masala. This recipe yields 7 medium sized naans.

Garlic Herb Naan with Aloo Masala

Naans serve with Indira’s Aloo Masala.

Thiruvadhirai Kali and Ezhukari kozhambu

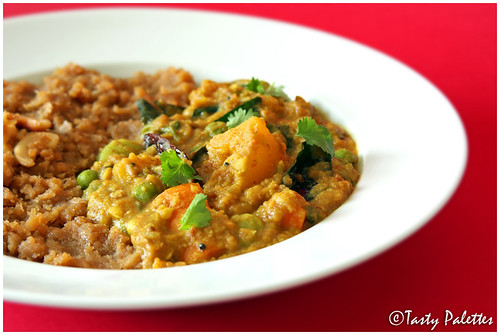
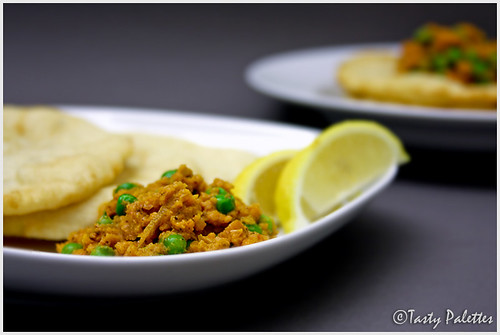
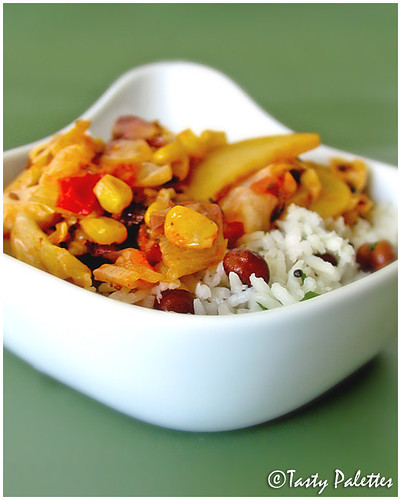
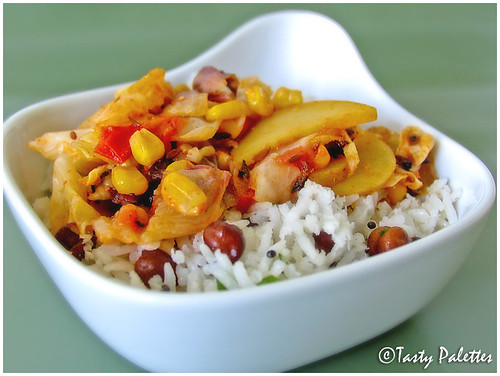
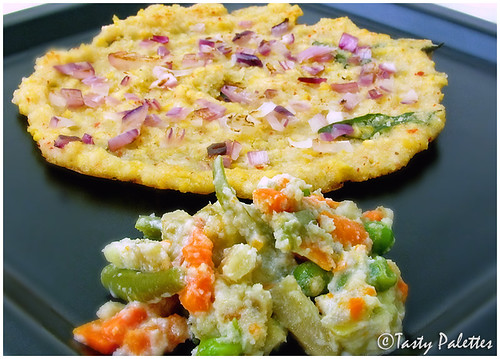
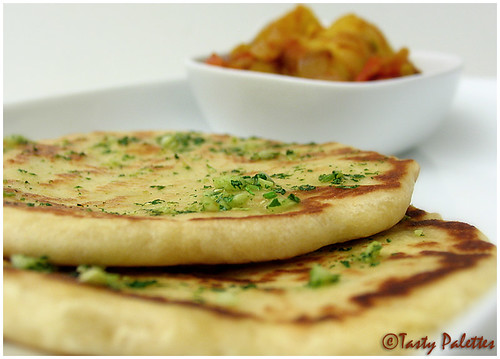
If you are not able to read what the title says, don’t bother. Kali is rice cooked with jaggery and Ezhukari kozhambu, which is sambar with 7 vegetables. This is a classic combination made for the festival of Thiruvadhirai. Thiru + Adhirai is Thiruvadhirai, which is the birthday of Lord Shiva. Adhirai is, obviously his birth star, and hence the day is called Arudhra Dharisanam. I remember my Grandma pointing this star in the Northwest skies. It sparkles like a ruby, in bright red.

Facts apart, I love this festival, food being the primary reason. I am not a big fan of sweets, but ok with anything mildly sweet. Kali being rice cooked with jaggery is served with a savoury sambar. The sweet and spicy combination is like yin-yang for the taste buds, and I absolutely love it.

Thiruvathirai Kali

This kali is also made with a mixture of rice and dal. Since the kozhambu has dal in it, I don’t find it necessary. The measurements given below serves two people.

Ingredients

Raw rice – ½ cup
Water – 1¼ cup
Jaggery – 1 cup, grated
Coconut – ¼ cup, grated
Ground elaichi or cardamom – ½ tsp
Cashews – 10
Ghee – 2 tsp

Method

Roasted rice

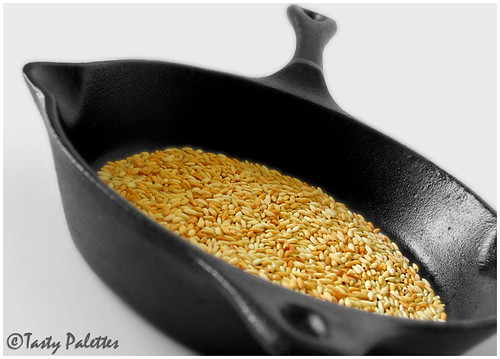
Roast rice until red. Wash rice and grind into a coarse meal, like rava. Roast cashews in a tsp of ghee until golden brown. Set aside.

In a pan, heat water and dissolve jaggery. Once dissolved, add coconut, ground rice and a tsp of ghee. Mix well and transfer to another vessel. Pressure cook this for 2 whistles. When done, cool and fluff. Mix roasted cashew nuts and ground elaichi. Serve with kozhambu.

Thiruvadhirai Kali

Ezhukari Kozhambu

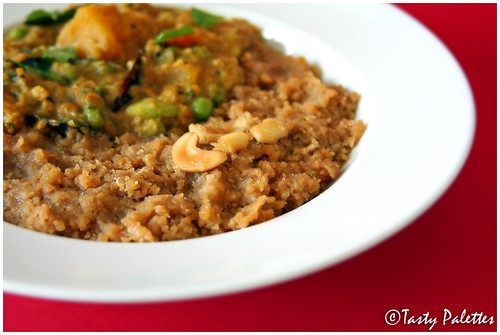
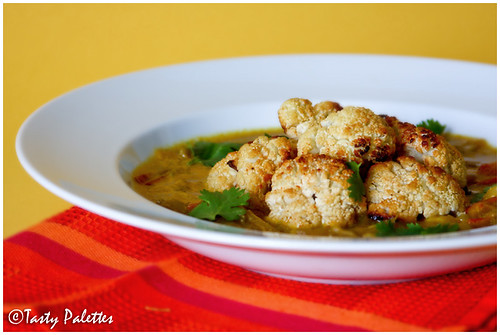
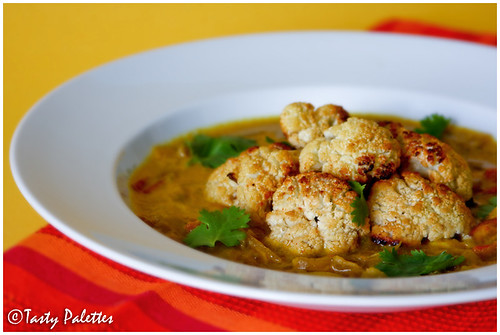
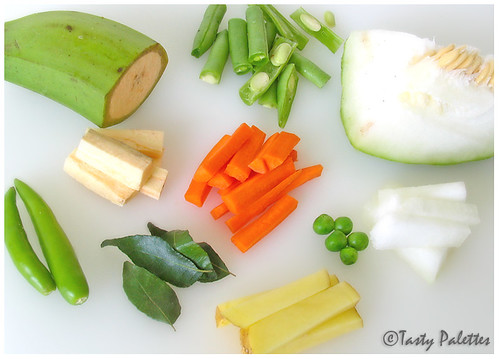
Ezhukari kozhambu is supposed to be made with 7 vegetables, but you can add as many or as less as you want. This is more like sambar, but with lots of vegetables. In olden days, after the festivities are over, the ladies would mix left-over vegetables and sambar that was made earlier in the day. The resultant gravy is a delicious mixture of sweet root vegetables(plenty during the season) and spicy sambar.

My family calls this “Ericha Kuzhambu’, which loosely translates to sambar that is heated over and over again. This kuzhambu tastes better as it grows older, like wine. Well not that old, but 2 or 3 days. When this gravy is heated again and again, the vegetables almost melt mixing with spices. What is left is a divine concoction that goes well with almost everything, dosa and curd rice, in particular. If you are worried about nutrition depletion due to over heating, please look away. This is beyond all of that.

Ingredients

Mixed vegetables – 3 cups, cubed
Tamarind paste – 2 tbsp
Turmeric powder – 1 tsp
Asafoetida – a pinch
Toor dal – ¼ cup
Mustard seeds – 1 tsp
Curry leaves – 10
Cilantro – few springs, chopped
Oil – 1 tbsp
Salt

Spice mixture

Coriander seeds – 3 tbsp
Chana dal – 1 tbsp
Fenugreek seeds – ¼ tsp
Red chillies - 8

Roast all of the above in a tsp of oil and grind to a fine paste.

Method

Vegetables that can be used are Red pumpkin, White pumpkin, eggplant, sweet potato, potato, lima beans, peas, plantain, yam, elephant yam, colocasia, green beans, runner beans, cluster beans, chayote squash(chow chow), green chillies, snake gourd.

Pressure cook dal with a pinch of turmeric powder. In a big pot, mix vegetables, tamarind paste, turmeric powder, salt with enough water and boil until the vegetables have cooked and tamarind doesn’t smell raw. Combine the ground paste and cooked dal and bring it to a boil. Allow this to boil on a low flame for 5 minutes. Adjust seasoning as required. In a small pan, heat oil, splutter mustard seeds and throw some curry leaves. Add this to sambar, along with cilantro and asafoetida. Serve with kali.

Ezhukari Kozhambu

This is my second entry for RCI – Tamil Festivals, hosted by Viji.