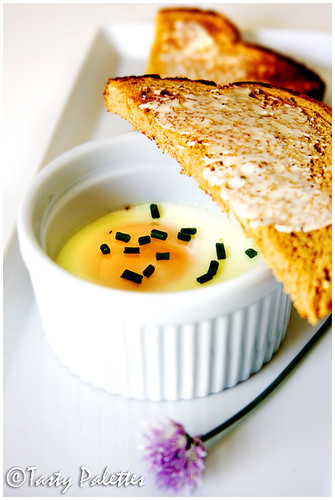
Eggs En Cocotte

That’s a fancy name for eggs baked in a cup or ramekin. Easy as 1,2,3, the eggs are baked with cream, salt and pepper and served with buttered toasts.

After a visit to the farmer’s market, I always come home with farm-fresh eggs with bright coloured yolks and freshly baked bread. So eggs and toast is our standard weekend brunch. Some days the eggs are scrambled, other days they are baked or broiled.

In this method, the eggs are gently cooked over a water bath, until the whites are set but the yolks are still runny. By the time I put away vegetables from the weekly trip, the eggs are done and breakfast is served without breaking a sweat. Easy, huh? Did I say they make a pretty presentation?

I have cooked the eggs with only half-and-half, but you can also drizzle melted butter over the eggs before sliding into the oven. Other substitutions that can be made are parmesan cheese instead of salt, and tarragon instead of chives. You can also bake the eggs with chopped tomato or sauteed mushrooms. This is my entry to Waiter, There is something in my… Breakfast, hosted by Johanna at The Passionate Cook.

Eggs En Cocotte

Ingredients

Eggs – 4
Half-and-half or cream – 4 tbsp
Salt
Pepper
Chives
Butter for greasing

Method

Preheat oven to 350F. Grease 4 ramekins with butter and season the bottom with salt and pepper. Crack one egg per each ramekin and drizzle 1 tbsp of half-and-half or cream per ramekin. Place the ramekins in a pan and fill the pan with hot water till it reaches about half the height of the ramekins.

Bake for 15 minutes, until the whites are set and egg yolks are still wiggly. Bake for additional 2 minutes if you want the yolks to be completely set too. The eggs continue to cook a bit even after removing from the oven. Let the ramekins rest for 2 minutes and serve garnished with chopped chives and buttered toasts. This serves two.

Fruits

This is my entry for this edition of CLICK – Au Naturel, created and hosted by Bee and Jai at Jugalbandi.

Edited to Add: Eggs en cocotte is my entry for WBB - Express Breakfasts, hosted by Raaga, The Singing Chef. WBB is Nandita's conception. For breakfast recipes that can be whipped up in under 15 minutes, head over to her blog for the roundup.

Purslane Kootu

A visit to the local farmer’s market is something I eagerly look forward to. Its either the motivation of laying hands on the freshest produce that I will serve my family; or the interaction with the person who devotedly grew it; or the knowledge I gain on growing/storing produce and herbs; or just the lively atmosphere and the music. The farmers are always eager to share recipes for vegetables or greens that I haven’t tried before. Sometimes they recommend their favourites, which I make sure to buy. Last fall, we feasted on a locally grown variety of apples, thanks to one such recommendations. Thin skinned, small and sweet, it was hard to believe that they were actually fruits and not candy. The farmer even complained that she had to stop her son from eating more than three a day.

Armenian Cucumbers

Over the last few weeks, I was lucky to be introduced to new kinds of produce. Lets start with these Armenian cucumbers. Long, slender and slightly ribbed, they looked a cross between snake gourd and an English cucumber. Some were bright green, and others were lighter coloured. But they both taste sweet and crisp, and didn’t require peeling. Their taste and texture reminded me of a variety of cucumbers that are small, sweet and crisp and are usually sold at bus stands in India. I was happy to rediscover ‘em.

Giant Okras

Giant okra compared with regular ones

Next stop, okra. Not your everyday okra, but huge ones. When I saw them, my first thought was, why would anyone want to cook such mature okras. Surprisingly, these giants were still tender. The grower, Maya, explained to me that this was another kind of okra and taste the same as the regular ones. They did, in addition to being less slimy.

Purslane

Last, but not least, is Purslane or Verdolaga, known as 'Paruppu Keerai' in Tamil. An edible weed native to India, they can be cooked or eaten raw. I preferred cooking it, but there weren’t many recipes around. Cooking with dal was definitely a safe option. But noticing the delicate leaves, I want to give them an opportunity to shine on their own.

I turned to Pedatha, who has always inspired me in the past. In addition to recipes, what I look for in a cookbook are ideas and methods that I could adapt to my own liking. This book has it aplenty. A recipe that called for amaranth/spinach caught my eye, and I decided to adapt it. The kootu, as I like to call it, was divine. Once cooked, the leaves were unbelievably tasty, tender and not even slightly bitter. I am certain that we would enjoy this recipe over and over, for years to come.

I am sending this to JFI – Love, hosted by Jigyasa and Pratibha. This edition of Jihva is about honoring those individuals that inspired and enriched your culinary world. I find it only apt to pay my tribute to Pedatha, with one of her own recipes.

Purslane Kootu

Purslane kootu served with rice, Armenian cucumbers and eggplants sautéed with sambar powder

Purslane Kootu

Ingredients

Purslane – 3 bunches, chopped coarsely along with stems
Roasted gram – 2 tbsp, powdered
Ginger – 1 inch piece
Garlic – 2 cloves
Green chillies – 4
Cilantro – ½ cup, packed
Mustard seeds – 1 tsp
Urad dal – 2 tsp
Turmeric powder – ¼ tsp
Oil – 1 tbsp
Salt

Method

Grind ginger, garlic, green chillies and cilantro into a smooth paste with little water. In a pan heat oil, splutter mustard seeds and roast urad dal until golden brown. Add the greens, turmeric powder and cook covered until the greens are done. Add the ground paste and salt, and cook for additional two minutes. Remove from heat and add powdered gram. Serve with rice and vegetables.

A+Veggie+Venture+2008+Fresh+from+the+Farmers+Market+400.jpg

This icon, courtesy of Alanna at A Veggie Venture, celebrates farm produce and encourages bloggers to seek out locally grown produce. Remember Ms. Blush, the sweet tomato from last year? This being Earth Week, I found it apt to blog about local-grown produce. If you haven't gone local yet, here are 10 reasons why you should. 'Going Local' is one of the 51 things we can do to save the environment.

On a separate note, there seems to be a problem with my TOI feeds. While Sailu is working on the issue, feel free to subscribe my feeds in your reader.

Aioli With Rosemary – Infused Oil

Flavoured oils are easy to prepare and fun to work with. Just a drizzle is all it takes to impart flavour to a salad, soup, or anything that fancies you. A little planning is all it takes. This is how I make rosemary-infused oil.

Rosemary - Infused Oil

Rosemary – Infused Oil

Rosemary – 2 or 3 sprigs
Good quality olive oil – ¼ cup

Wash and pat dry rosemary springs. Take a clean jar, place the sprigs and pour oil into it. Let sit in the refrigerator for about 7 to 10 days. When the flavour is strong, remove the sprig and store oil covered in the refrigerator. This will keep for more than 6 months.

How do I use rosemary oil? Drizzled on top of soup just before serving; brushed over bread while making toasts or sandwich; drizzled over pasta if I don’t have herbs on hand; in dips or spreads.

This aioli from Tassajara uses silken tofu and rosemary oil. Though labeled as condiment, the spread is quite filling due to its protein content. We had this for dinner with toast and olives and finished of with a fruit salad.

Rosemary Aioli

Ingredients

Rosemary oil – 2-3 tbsp
Silken tofu – 1 lb
Garlic – 2 small cloves
Lemon juice – 1 tbsp
Salt

Method

Blend all the ingredients together in a food processor until smooth. Adjust seasonings per your liking. The aioli should have a strong rosemary flavour. Serve with toasts or vegetables.

Tofu Rosemary Aioli

This is my entry to Kalyn’s Weekend Herb Blogging, hosted by The Well-Seasoned Cook, Susan.

Ragi Dosa – Sweet and Savoury

The balloons are gone, and so are the cupcakes. Celebrations are long over and I am slowly getting back to normal blogging. Few blog events were missed as I had been under the weather. Let me break the spell with one, or should I say, two-in-one recipes?

Before going to the recipes, I have something to share with you. Meeta and The Daily Tiffin have graciously accommodated me into their team. I am excited to be a part of this well-respected team of bloggers and will be contributing monthly. Do check out my first article Vegetarianism – An Introduction.

That said, its raining dosas everywhere, thanks to Srivalli who is hosting Dosa mela. I know I am late, but am joining the bandwagon anyway with my ragi dosas, huffing and puffing. Check out the two-part roundup she has done so far.

Finger Millet, known as Ragi or Kezhvaragu (Tamil) is highly nutritious and grows easily in less than perfect conditions. Inexpensive, readily available and quite filling, no wonder its called poor man’s food. But don’t let this fool you, because its quite rich in taste. As with any whole grain, it has a signature nutty taste, which works well in both sweet and savoury dishes.

Sweet and savoury, that’s how my mom served ‘em. She used to treat us with both versions of dosas made with ragi or wheat flour. I recreated the same meal in an effort to relive my childhood. And it worked like a charm. A ballet on the taste buds with salty and sweet notes. Previously, all my attempts have been less than satisfactory. Either the dosas were leathery or doughy. This time I followed Meenakshi Ammal’s recipes and they hit right on spot.

Most of the Indian grocers carry ragi flour. Whole wheat flour can be replaced for ragi flour in both the recipes, to make sweet and savoury wheat dosas (Godhumai dosa). Serves two when served together.

Savoury Ragi Dosa

Ingredients

Ragi flour – 2 cups
Urad dal – ¼ cup
Salt – 1½ tsp
Sour curds (optional) – a ladle full
Oil

Savoury Ragi Dosa

Savoury ragi dosa served with tomato-coconut-garlic chutney

Method

Soak urad dal for 2 hours. Refrigerate for 20 minutes and grind to a smooth and fluffy batter. Mix ragi flour, salt and water and make a tight dough. To this, add the ground urad batter and mix thoroughly. If you are making dosas the next day, let this batter ferment for 6 to 8 hours. If using on the same day, mix sour curds to the batter. The final consistency of the batter should be thinner than pancake batter.

Heat a griddle over medium-low heat. Wipe it with an oiled paper towel/towel. Pour about 1/3 cup of the batter. Drizzle ½ tsp of oil along the periphery of the dosa. Let it cook for a minute, slowly flip and cook for about 30 seconds on the other side. Wipe the griddle with oiled towel between dosas. Serve while hot with your favourite chutney.

Sweet Ragi Dosa

Ingredients

Ragi flour – 1 cup
Rice flour – 2 tbsp
Jaggery – ½ cup
Grated coconut – 1 tbsp
Ground cardamom – 1 tsp
Oil
Butter – to serve (optional)

Method

Boil 1¼ cup of water. Remove from heat, add jaggery and let it dissolve completely. Mix rest of the ingredients except oil and whisk to a smooth batter without lumps.

Over the same griddle on medium-low heat, pour 1/3 cup of the batter. Drizzle ½ tsp of oil along the periphery. Cook for a minute on one side, flip and cook for additional 30 seconds. Wipe the griddle with oiled towel between each dosa.

Sweet Ragi Dosa

Unlike savoury dosa, the sweet ones are lacey and spongy. Serve hot with a dab of butter.

Last Year This Day...

I gingerly stepped into the world of food blogging. 365 days and 121 posts later, my love for this web space hasn’t diminished a bit.

Balloons

Looking back, I am pleased with what ‘Tasty Palettes’ has become; a creative outlet for my passion for cooking and photography. Not to mention, the opportunities this blog has given, to mingle with people of similar interests and meet great personalities. ‘Tasty Palettes’ has also given me some great new friends for whom I am very thankful for. I eagerly look forward to what the future has in store.

I would like take this opportunity to thank each one of you, for visiting my blog and extending your support day in day out.

Blog Birthday

To ‘Tasty Palettes’, and many more wonderful blogging days!

Taming The Beast – Baked Portobello

When I first tasted roasted portobello sandwich, I took all the mushroom slices out and ate just the bread. It was too meaty for my liking and I vowed never to lay my hands on it again. Even though crimini and shitake were regulars in my kitchen, portobello took a long time to be accepted. Until I learnt to tame the beast, that is.

Portobello Mushroom

I understood that this meaty fungus takes more than a simple salt and pepper seasoning. Taking inspiration from a restaurant meal, I recreated the recipe with few twists of my own. The cavity is filled with spicy tomato-cream sauce(or any tomato sauce you have on hand) and topped with two kinds of cheese, like a pizza. To make it a wholesome meal, I serve it on a bed of salad greens. The tomato-cheese filling is spicy, tangy and creamy; the greens, dressed with a simple lemon vinaigrette, are crisp and fresh. Healthy, filling and best of all, tasty. Now there is no reason not to welcome this mighty but, tamed beast, into my kitchen. This entrée salad goes to No Croutons Required - Mushrooms, a monthly soup and salad challenge hosted by Lisa and Holler.

Ingredients

Portobello mushroom – 2, large sized
Marinara or any tomato sauce – ½ cup
Mozzarella cheese – ½ cup, shredded
Parmesan cheese – 2 tbsp, grated
Salad greens – enough to serve two
Lemon juice – 2 tbsp
Olive oil – 1 tbsp
Salt
Pepper

Method

Preheat oven to 400F. Clean mushroom caps with a damp towel. With a small spoon, gently remove the gills and tough stems. Season the cavity with salt and pepper and spoon marinara sauce into it. Top with mozzarella cheese followed by grated parmesan. Bake for 15-18 minutes, until the cheese is brown and bubbly. Let the mushrooms rest for 2 minutes.

Meanwhile, dress salad greens with lemon juice, olive oil, salt and pepper. Serve warm portobello over the greens.

Baked Portobello

Mushroom recipes blogged so far

Tangerine And Olive Oil Pound Cake

While leafing through Pure Dessert by Alice Medrich for the first time, her Sherry and Olive oil Pound Cake called to me. Perhaps it was my partiality towards olive oil or citrus based quick breads, or the way the loaf was pictured in her book, wrapped in a parchment paper. Either ways, I made a mental note to make it at home some day. That some day proved to be elusive. Reasons like having one too many baked goods during the holiday season, and running out of ingredients can be blamed. Or to be honest, the cook in me went on hibernation for sometime.

Tangerine Olive Oil Pound Cake

Only after seeing this inspired creation, I realized what I am abstaining from. Cenk, who writes at Café Fernando, needs little introduction in the food blogging community. Amazing photos, inspiring posts and down-to-earth recipes makes CF one of the cherished blogs. Incidentally, Café Fernando turned two this week. Many congratulations, Cenk.

Coming back to the recipe, there was no reason not to try it; for it was a citrus based olive oil pound cake. I followed the recipe, but made two changes. Tangerines were used in place of clementines; egg whites were used instead of whole eggs, as there was enough fat in the recipe.

I was pretty excited when I baked the pound cake for the first time. The loaf was golden and risen; looked and smelt good. When I popped the first piece into my mouth, it was… er, disappointing. The cake was not sweet enough and looked like it could use more salt. Dejected, I wrapped the left-over loaf and left it in the countertop. I was thinking trifle or bread pudding to disguise it. Two days later, I took one last peek at the cake, before losing it into the depths of my refrigerator. It looked glossy and aromatic, so I doubtfully took a bite. Kapow! The cake tasted divine. The sugar and salt was just right; best of all, I could smell and taste the citrus and the fruity olive oil. Now I know the trick. It gets better as it sits. With this knowledge, here is the recipe, with due credits to Alice Medrich for the original version and Cenk for the tweaked version.

Making Tangerine Olive Oil Pound Cake

Ingredients

All purpose flour – 2 cups
Baking powder – 1½ tsp
Salt – ¼ tsp
Sugar – 1 cup
Tangerine zest – 2 tbsp
Extra-virgin olive oil – 2/3 cup
Eggs – 3, whites only
Tangerine juice – 1 cup

Method

Preheat oven to 375F. Line a loaf pan with parchment paper. Sieve all purpose flour, baking powder and salt in a bowl and set aside.

In a large bowl, take sugar and zest and whisk them with an electric beater to release flavour from the zest. Add olive oil and whisk until well combines. Beat eggs into the oil mixture one at a time. Divide flour into 3 portions and juice into 2. Add flour and juice alternately to the egg mixture, mixing gently after each addition. Pour into the prepared pan and bake for 50 minutes or until a toothpick comes out clean. Cool completely on a wire rack, wrap in a foil and enjoy after a day or two for enhanced flavour.

Tangerine Olive Oil Pound Cake

Same cake, different styles by Lara and Deeba. If you are looking to bake this cake in India, tangerines are called ‘Kamala orange’ or ‘loose jacket orange’. This is my entry to Monthly Mingle – Spring Fruit Sensations hosted by Abby at Eat The Right Stuff. MM was created by Meeta at Whats For Lunch Honey?

Pear Crostini

I was left with a stale loaf of baguette as hard as a baseball bat. With a little research and a great recipe, I turned it into a delicious tea-time snack. This is what I did to refresh the stale bread.

Heat the oven to 275F. Mist the loaf with water and heat for 4 minutes. Mist again and bake for another 3 minutes. The bread is now crusty on the outside, soft and chewy on the inside, ready for immediate use.

The recipe given below is adapted from Vegetarian Sandwiches by Paul Mitchell. Though the combination of ingredients sounded a little odd, I decided to follow it. Mainly because, every one of the recipe I have tried from this book is a hit. And so was this. The pear was sweet and soft, with a hint of maple syrup, and the parmesan cheese was a nice touch.

Ingredients

Baguette – 12 slices, 1/3 inch thick
Slightly ripened pear – 1, peeled, cored and sliced thin
Maple syrup – 2 tbsp
Cream cheese – ¼ cup
Parmesan cheese - 3 tbsp, grated

Method

Toss pear slices with maple syrup and let it sit for about 15 minutes. Preheat the broiler.

Generously spread cream cheese over baguette slices, and arrange on a baking sheet. Top baguette with sliced, marinated pear and grate parmesan cheese over the fruit. Broil the crostini 4 to 5 inches from the heat source for about 2 minutes. The pear slices will be tender and the cheese melted and browned. Serve warm or at room temperature.

Pear Crostini

Since I used stale bread, I did not toast the slices. If you are using fresh or soft bread, do toast it until golden brown, before assembling the crostini. This goes to Raaga at The Singing Chef, who is hosting AFAM – Pear.