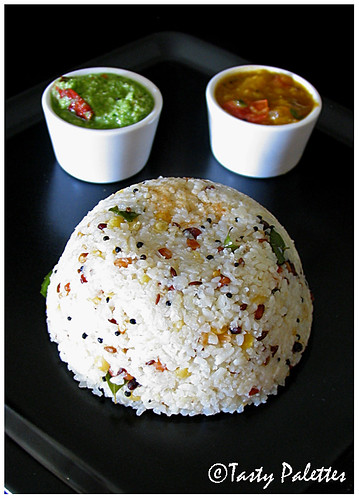
Arisi Upma – Cream of Rice Upma

Growing up, I was not hot for arisi upma. But, like so many other foods, I now appreciate the humbleness and simplicity of this dish. Back in the days, this upma is prepared in a bronze pot (vengala paanai). The slightly burnt upma stuck to the bottom of the pot is to die for. Fast forward to present, this is made in a kadai, pressure cooker or rice cooker. I find the rice cooker version easy. Switch on the cooker and dinner is ready in 20 mintues.

Arisi Upma - Cream of Rice Upma

Back in India, my mom would visit the flour mill once a month, give the operator at the mill a bag of rice and make a batch of rice flour and another batch of rice rava. But here, in the city where I live, there is no flour mill that I know of. But when I set off to make some rice rava, most of it becomes flour. Despaired, I gave up making rice rava upma.

But this time when I visited India, I observed my MIL soaking her rice before grinding. The soaked rice is not only easy to work with, but also yields uniform rava instead of turning into flour. Now, am back into action :).

Ingredients

Raw rice – 1 cup
Toor dal – 1 fistful
Coconut – 1/3 cup, grated
Mustard seeds – ½ tsp
Urad dal – 1 tsp
Chana dal – 1 tsp
Pepper – ½ tsp
Cumin seeds – 1 tsp
Red chillies – 4 to 6
Curry leaves - few
Salt
Oil – 1 tbsp

Method

Wash rice and dal together thrice and drain the water completely. Leave it for 20-30 minutes. Take this mixture in a food processor/mixie and pulse for 2 or 3 times. The rice should be coarsely ground, but not as fine as rava (semolina). This will yield about 1¼ cups of rice rava which serves two.

Transfer the ground rice to a rice cooker. In a seasoning pan, heat oil, splutter mustard seeds. Add chana dal, urad dal, red chillies, pepper, cumin seeds and curry leaves, in that order. When dal becomes brown, add this seasoning mixture to rice. Also add coconut, salt and 2½ cups of water. Mix well and turn the rice cooker switch on. When done, fluff the rice, let rest for 5 minutes and serve with a drizzle of coconut oil, if desired.

IMHO, arisi upma is best had with sambar, followed by gothsu. I make sure there is left-over sambar whenever I make this upma for dinner. Today, I served it with onion sambar and coconut+coriander leaves chutney.

Arisi Upma - Cream of Rice Upma

Recently, I came across idli rava in Indian stores. Though I have never tried it, I believe it may work well in this recipe. I like making my own rice rava, so that I can control how big I want it to be. Also, toor dal in the above recipe is optional, if you want a totally white upma.

Here are some guidelines for using water in various upma. Of course, the ratio depends on the hardness of the water you use.

Rice rava upma – 1 cup of rice rava : 2 cups of water
Rava/Sooji upma – 1 cup of rava : 1½ cups of water
Vermicelli upma – 1 cup of vermicelli : 1 cup of water

This might be a humble dish, but it is one of those recipes that makes best use of rice, in my opinion. So this is my entry for JFI-Rice, hosted by Sharmi of Neivedhyam. JFI is an event conceived by Indira of Mahanandi.

Sugar Snap Peas Sauté

Sugar snap peas are a cross between garden peas and snow peas. They do not require shelling, which means, the whole pod is edible. I buy them regularly when they are in season, during the months of June and July. They are a delicious, crunchy addition to any stir-fry, salad or omelette. They can be bit pricey during off-seasons, but when they are cheap, I have blanched snap peas almost everyday. With only 45 calories per cup, there is no reason to stay away from them.

Why they are called sugar snap peas? I have no idea. Probably because they are sweet and pop when snapped. When buying sugar snap peas, select pods that are bright green, flat and tender. They have strings that must be removed before cooking. Pinch one end of the pod and pull the string toward the other end.

Sugar Snap Peas

Clockwise from left: Sugar snap peas, strings removed and cut

After having endless salads and stir-fries, I decided its time to introduce spices to these tender peas. Since they are delicate, the spices used in this curry are also minimal. Going with my instinct, I paired these peas with cumin and nothing else. The marriage between this western vegetable and Indian spices was, indeed, gratifying. Now, every time I buy snap peas, I cannot help, but prepare this curry.

A word of caution, do not cook these peas for a long time. When overcooked, they become mushy and the flavour is destroyed. Prepare this as you would do a stir-fry, but Indian style.

Ingredients

Sugar snap peas – 2 cups, sliced on an angle
Onion – 1, sliced
Tomato – 2, chopped
Garlic – 2 cloves, finely chopped
Cumin seeds – 1 tsp
Cumin powder – 1½ tsp
Red chilli powder – 1 tsp
Salt
Oil – 1 tbsp

Method

Heat oil in a wok. Splutter cumin seeds and sauté onion and garlic, until onions turn soft. Add chopped tomatoes and sauté till they are cooked. To this, add sugar snap peas, cumin powder, chilli powder and salt and cook for 3 minutes, stirring in between. Serve warm with roti.

Sugar Snap Peas Saute

Since its got cumin written all over it, this goes to Sunita’s Think Spice – Think Cumin. Thank you Sunita for being a gracious host and accepting my late entry.

Green Sandwich

With grocery shopping pending for a few days now, I had to prepare lunch with what I had on hand. And, I didn’t have much. I scoured the fridge and put together a ‘Green Sandwich’. Lunch with a theme wouldn’t hurt, after all.

Green Sandwich

Ingredients

Sandwich bread – 4 slices
Zucchini – 1, small
Green bell pepper – 1
Spring onions/Scallions - few
Swiss or Gruyere cheese – 4 slices
Egg – 4
Butter – 2 tbsp
Cilantro or Parsley
Salt
Pepper

Method

Cut zucchini into thin strips and bell pepper into 8. Cut scallions the same size as the other vegetables.

Heat a pan and sear the vegetables on high heat for 2 minutes on each side. You can, alternately, grill them. Season them with salt and pepper and set aside.

Apply butter to the bread on both sides and toast them. When they are still hot, place the cheese slices on top of the bread and remove from heat. The residual heat from the bread will melt the cheese. Pile the roasted vegetables on top of the cheese.

Melt butter in the pan, crack open the eggs and fry them to your desired level of doneness. Season them with salt and pepper and place the fried eggs on top of the sandwich. Sprinkle with finely chopped cilantro and enjoy this open faced sandwich when its hot.

Orange Butter

Flavouring butter is a fun thing to do, if you haven’t tried yet. Depending upon my mood, I sometimes flavour them savoury by mincing together a green chilli, mint and coriander and mixing it with salted butter or butter spread. However its the sweet variety that I have a lot of fun with. Any fruit preserve + unsalted butter = fruit flavoured butter.

My favourite flavour is orange and mango comes to a close second. Using marmalade instead of fruit jelly/jam gives an interesting dimension, every time you bite into the fruit bits. Also, the orange marmalade I use, which I buy from Trader Joe’s, is slightly bitter, cutting into the richness of the butter.

Ingredients

Orange marmalade – 2 tbsp
Unsalted butter – 4 tbsp

Method

Allow the butter to come to room temperature. Take them both in a medium sized bowl and beat with an electric beater for 2 minutes, until they are well combined and fluffy. Transfer to a small airtight container and enjoy with your favourite bread.

Orange Butter

I enjoyed mine with Cranberry-Blueberry bread, which was the bread of the month, from a nearby bakery. A daring baker like Meeta, may be smart enough to cajole the baker to give away the recipe and try at home. But, me, I am just a happy customer who bought this bread thrice last month :).

On a separate note, its recognition time. First it was Manisha, now it is Bharathy, Prema, Srivalli and Viji. Thanks to these bloggers, I was honoured with these awards.

Thoughtful Blogger Award

Rockin Girl Blogger

Schmooze Award

In addition to recognizing fellow bloggers work, these awards also shows we care. Thanking these bloggers for honouring me, I am passing them to others. I know most of you have been recognized, so here are a few that I am passing on to. If you have already received this award, then you deserve it more than once.

Thoughtful blogger – Indira, Arundati, Susan, Menu Today, Nupur, Nandita, Trupti.

Power of Schmooze – Priya, Sandeepa, Shyamala.

Rockin’ Girl Blogger – ISG, Shn, Smita.

Rockin Guy Blogger

Since Bee has rightfully modified the Rockin’ Girl Blogger to suit guys too, the Rockin' Guy Blogger award goes to Jai and Anthony.

Florentine-Style Stuffed Mushrooms

It wouldn’t be fair if I wrote a 1-in-3 series about mushrooms, without a stuffed-mushrooms recipe. They are one of the few vegetables that tastes great when stuffed, not only because of their shape, but also their rich flavour and texture.

The stuffing can be as decadent as a cream cheese or simple as seasoned bread crumbs. Here, I stuff my mushrooms with a layer of spinach, for nutritional value, and bread crumbs, for the crunch. They can be served as appetizers or a light supper with green salad. You can prepare them 12 hours in advance and bake them just before you need ‘em. This is ‘3’ of the 1-in-3 - Mushrooms.

When selecting mushrooms for stuffing, buy ones that are fairly large to hold the filling. I normally buy mushrooms that are labeled as 'Stuffing Portabella'. I find them regularly at Trader Joe’s.

Ingredients

Stuffing portabella mushrooms – 6
Onion – ¼ cup, finely chopped
Garlic – 2 cloves, chopped
Fresh or frozen spinach – ½ cup, cooked, if fresh and squeezed
Oregano –1 tbsp
Red pepper flakes – ½ tsp
Juice of a lemon
Bread crumbs – ½ cup
Thyme or parsley – 2 tbsp, finely chopped
Oil or melted butter – 3 tbsp
Salt
Pepper

Method

Preheat the oven to 375F. Grease a shallow ovenproof dish or a baking pan. The dish should be big enough to hold all the mushrooms in a single layer. Remove the mushroom stalks and using a small spoon, carve the insides of the mushroom caps, to hold stuffing.

In a pan, heat a tsp of oil, sauté onion and garlic. When onions become soft, add spinach, oregano, red pepper flakes and salt. Mix well and take off the flame. Add lemon juice to the mixture.

In a bowl, combine bread crumbs, thyme, pepper and oil or melted butter. Mix until the bread crumbs is moistened.

Arrange the mushroom caps, gills uppermost, in the prepared dish. Drizzle the caps with oil and season with salt and pepper. Divide the spinach mixture among them. Top with the bread crumbs mixture. Bake for 25 minutes, until the mushrooms are tender and the topping is golden brown.

Florentine-Style Stuffed Mushrooms

Stuffed mushrooms served with sweet potato fries and cucumber slices – A simple summer lunch.

Mushroom - Biscuit Dough Sandwich

Sandwiches/wraps are mostly made with bread, pitas, roti or tortillas. But when I didn’t have any of these and still wanted to make a sandwich, my creativity kicked in, out of desperation (as always!). I made a sandwich out of biscuit dough, not sweet ones, but country-style biscuits that can be found in the refrigerator section.

I don’t buy biscuit dough often. But on those days when you are dog tired and all you want is a hot bowl of soup and good bread to dunk in, these come in handy. Since I already use them as bread, I decided to experiment them in a sandwich. And it definitely worked. This is a convenient meal when you want to put together with what you have on hand. Any spicy left-over vegetables from your refrigerator would also work here.

Biscuit Dough and Oyster Mushrooms
Oyster mushrooms and biscuit dough.

I have used oyster mushrooms which cook fast. If you are using any other type of mushrooms, I would recommend sautéing the mushrooms first, followed by onions and tomato, like I did in Mushroom Masala.

Ingredients

Biscuit dough – 1 can
Oyster mushrooms – 1 pack, sliced
Onion – 1, sliced
Tomato – 2, sliced
Ginger – 1 inch piece, finely chopped
Garlic – 3 cloves
Cumin seeds – ½ tsp
Red chilli powder – 1 tsp
Garam masala powder – ½ tsp
Turmeric powder – ¼ tsp
Salt
Oil

Method

Preheat the oven according to the directions in the biscuit dough package.

In a pan, heat a tsp of oil and splutter cumin seeds. Add onions, ginger and garlic. When onions become soft, add tomatoes, mushrooms and all the dry powders with salt. Cook until mushrooms are soft and everything comes together. Allow this to cool a bit.

Coat a non-stick baking pan with oil. Take eight biscuits from the package and flatten them by your hands by pulling the edges. Flatten them till they are large enough to hold the filling. Lay them on the cutting board, and place filling on four of the biscuits. Top with the remaining four biscuits. Stretch and pinch the corners to seal them properly. Place them on the baking pan and bake for the time specified in the package.

Allow them to cool for two minutes and serve warm.

Biscuit Dough Sandwich

Mushroom - Biscuit dough sandwich is '2' of 1-in-3.

1-in-3 Mushrooms

Mushrooms

Its been a while since I devoted my time to 1-in-3 series. This time I chose an ingredient that you either totally love or dislike completely. I hope with these three recipes of mine will help people from Hate it camp move to Love it side.

Mushrooms are fruited body of fungi that contain spores, which act like seeds. They contain no chlorophyll, but they obtain their nutrition from breaking down and eating dead plants. The fungi stores these nutrients, and when conditions are right, they start to fruit – produce mushrooms.

If I had known this before trying them out for the first time, I wouldn’t have had ventured at all. Eating fungus does not sound that appetizing. But am glad that I did. The first mushroom dish I tasted should also be a reason for my liking – Mushroom Tikka Masala. Who wouldn’t love that?

There are umpteen number of mushrooms in the market, the common being the button mushrooms. But mushrooms which were wild are now being cultivated, meaning, we can get them in our local market at much lower cost. Mushrooms taste earthy, but each type has a distinct flavour. So play with them till you find those that suit your palette and the recipe on hand. Some types that I have tried are white, crimini, shiitake, portabella, oyster, chanterelle and porcini mushrooms. Follow the links for buying and storing tips.

The first of 1-in-3 is Mushroom masala. If you are trying mushrooms for the first time, then this is a good start. Because, the spices work perfectly together, downplaying the meatiness, which some people tend to dislike. Mushroom masala and Mushroom Chettinad are two of my most favourite mushroom recipes.

Ingredients

Crimini or button mushrooms – 2 packs, sliced
Onion – 1, big, sliced
Tomatoes – 2, sliced
Ginger – 1 inch, chopped fine
Garlic – 3 cloves, chopped fine
Green chillies – 2
Cumin seeds – ½ tsp
Cream – 2 tbsp
Sesame seed paste (tahini) or cashew butter – 2 tbsp
Red chilli powder – 1 tsp
Cumin powder – ½ tsp
Garam masala powder – ½ tsp
Oil/butter – 2 tsp
Salt
Cilantro

Method

In a skillet, heat oil and/or butter, splutter cumin seeds and sauté mushroom slices until they start to brown. Add sliced onions, green chillies and sauté until onions are limp. Now add tomatoes, ginger, garlic, cumin powder, garam masala powder and salt. Cook on low flame till tomatoes are cooked, sprinkling water if necessary. Mix cream and tahini and heat through. Switch off the flame and serve curry garnished with cilantro.

Mushroom Masala

If you don’t have tahini or cashew butter on hand, roast sesame seeds or cashew nuts, per your preference, soak in warm water for 5 minutes and grind to a fine paste.

Manisha of Indian Food Rocks has given me Thoughtful Blogger Award. I am not sure whether I deserve this, being only 4 months old in the blogosphere. But I would like to extend my heartfelt appreciation for thinking about me for this award. Thank you, Manisha!

Orzo Salad

Am back. And, its nice to be alive and kicking. First of all, a big Thank You, for each and one of you who were kind enough to visit here and wish me good health. Its nice to hear from you all, my blogging buddies.

After a week, spent indoors, I went to the vegetable market yesterday. The sight of bright, fresh and colourful vegetables and fruits, stacked neatly, is a feast for both eyes and soul. I came across these beauties and couldn’t resist picking them.

Cherry Tomatoes

These tomatoes were slightly bigger than a chickpea, but each bite was a sweet, fresh and a juicy burst inside our mouths. For $3.50 a lb, they better be.

Cherry Tomato V Regular Tomato

Though ideas of using them in a tart or pie showed up in my mind, I decided to use them as is. I was in no mood for a cold salad, therefore put together a warm pasta salad, that can also be served at room temperature. Orzo is a rice shaped pasta that cooks fast and works great in salads and soups.

As I am still under medication, I made a basic, less spicy version of the salad. Also I made one whole pound of pasta and snacked on it as and when I was hungry.

Ingredients

Orzo – 1 lb
Tomatoes – 1 lb
Red onion – 1, medium sized, chopped fine
Mixed herbs (cilantro, basil, mint) – ¼ cup, finely chopped
Salt

Dressing

Red wine vinegar – 1 tbsp
Extra virgin olive oil – 3 tbsp
Zest and juice of a lemon
Red pepper flakes – 1 tsp
Salt
Pepper

Method

Cook the pasta according to package directions. Reserve ½ cup of the pasta water before draining.

Whisk together all the ingredients for the dressing in a large bowl. Add the cooked warm pasta, onions, tomatoes and the herbs. Mix well and taste for seasoning. If the pasta becomes dry, add some of the reserved pasta water till each grain is separate. You can also add more olive oil.

Orzo Salad

Some other interesting additions would be
  1. Chickpeas – Soaked and cooked.
  2. Olives – Not the regular canned or jarred ones, but fresh ones from the olive bar. Their brine is an excellent addition to any salad.
  3. Pine nuts – toasted
  4. Any left-over vegetables.
I tried all of these variations every time I helped myself with the salad.

Really?!

Today, after two bed-ridden days, I logged into blogger, just to moderate comments (if any!). Thanks to the throat infection and hence the fever, all I had was rasam, milk and bread. With no desire to look at food photographs, blogging took a back seat.

I couldn’t believe my eyes when I read Manisha’s comment. I had to check it for myself. And, yes, its true! I did win this month’s Does My Blog Look Good in This for originality. Yay! This is the photo that I had submitted. For entries and winners, follow the link.

Vegetarian Dumplings

Thank you Manisha for bringing this to my attention. I submitted this entry, just few hours before the closing date, after much contemplation. A big thanks to Nupur, who encouraged me to go ahead.

Will be back when I am hale and hearty…

Capsicum Zunka

The first time I came across zunka was at Anthony’s Banchelor Kitchen. What drew me toward this dish was its simplicity, as with most of the Maharashtrian dishes. Personally, I am not a big fan of besan/chickpea flour, but the picture was tempting enough to give it a try once.

When I tried making it, I realized that besan takes longer to cook and more oil too. So the next time around I roasted the flour before hand. This way it took less time and oil making me one happy and proud cook.

Ingredients

Capsicum – 3, cut into 1 inch squares
Onion – 1, finely chopped
Besan or chickpea flour or gram flour – 2 heaped tbsp
Mustard seeds – ½ tsp
Chilli powder – 1 tsp
Coriander powder – 1 tsp
Turmeric – ¼ tsp
Salt
Oil

Method

In a pan, roast chickpea flour until lightly browned and aromatic. Set aside.

In the same pan, heat oil, splutter mustard seeds, and add onions. Sauté for a minute and add capsicum and salt. When capsicum is half done, add chilli powder, coriander powder and turmeric. Combine well and sprinkle roasted besan. Mix everything together, cover and cook on a low flame, until the capsicum is cooked and the spices don’t smell raw, for another 10 minutes. You can sprinkle water or add more oil while the capsicum is cooking.

Capsicum Zunka

This goes to Nupur’s Z of A-Z Indian Vegetables. It is sad that this series has come to an end, but, I am sure Nupur has other exciting plans for us in the future. It has been a fun ride. Thanks Nupur!