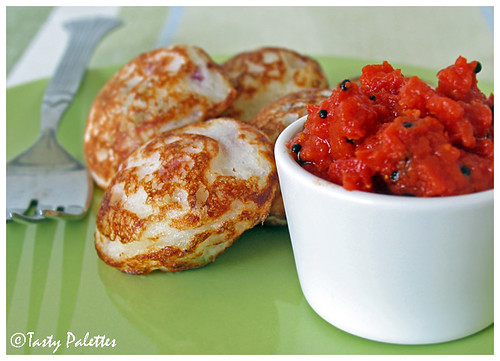
Puli Milagai – Tamarind Chilli

Green Chillies

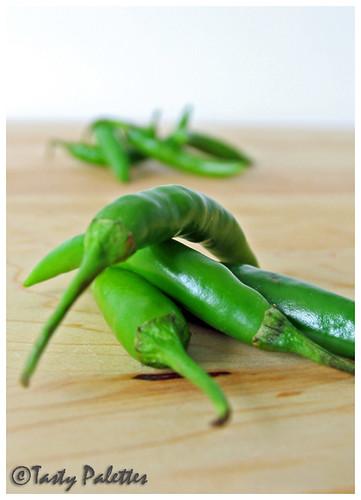
When Nandita announced this month’s ingredient for JFI, I decided to submit this childhood favourite of mine – Puli Milagai. Spicy green chillies are simmered in tamarind with, surprisingly, very few spices. Don’t be alarmed by the amount of chilli in the recipe, after all, it is the star of the recipe. The recipe is put together with ingredients that takes care of the spiciness leaving you with mildly spicy and tangy sauce with a hint of sweetness from the jaggery.

A word of caution if you are preparing a chilli dish for the first time. Open all the windows before you set out to prepare this dish. If your kitchen is well ventilated, you can sauté the chillies for 3 more minutes and then simmer in the tamarind sauce which reduces the overall cooking time. If not, as in my case, sauté no more than a minute, else it is very difficult to get rid of the spicy fumes trapped inside. This cooking time is compensated by simmering longer in the tamarind sauce. Also, don’t forget to use gloves while handling chillies. Now, don’t tell me I didn’t warn you.

Ingredients

Chopped green chillies – 1¼ cup
Tamarind paste – 4 tbsp
Jaggery – 2 tbsp
Asafoetida – a pea size
Fenugreek seeds – ½ tsp
Turmeric powder – 1 tsp
Salt – 1 tsp or as needed
Sesame or gingelly oil – ¼ cup

Method

In a medium sized dry pan, roast fenugreek seeds till dark brown. Set aside.

Heat oil in the same pan, and fry asafoetida evenly on all sides. Drain and grind with roasted fenugreek seeds and jaggery to a fine powder. In a small bowl, take a cup of water and mix the prepared powder along with tamarind paste, turmeric and salt and set aside.

In the remaining oil, over medium heat, sauté the green chillies for a minute. Add the tamarind mixture to the chillies and cook for 20-30 minutes or until the chillies get cooked. Add more water if necessary. The chillies will turn from bright green to brown-green as they cook.

Variations

  • Use powdered asafoetida instead of chunks. Roast the powder for few seconds and then add the chillies.
  • Slit the chillies instead of cutting them into rings.
  • If you are using raw tamarind instead of the paste, extract juice from a lemon sized ball of tamarind.

Puli Milagai - Tamarind Chilli

This is a must try recipe for all those spice-lovers out there. It goes well with anything, from upma to curd rice, from idly to roti. My favourite combo is with dosa. My mom would make this in the afternoon when I am not home. By the time I am come back from school, the chilli fumes would have subsided and a hot plate of dosa and puli milaga would await me. In an attempt to recreate my childhood memory, I made dosa just to serve with puli milagai :).

Chillies in Tamrind with dosa

Puli milagai starring chillies goes to Nandita, who is hosting JFI – Chillies, an event started by Indira.

Roasted Vegetables with Polenta

When a big question mark of what’s for dinner hangs over my head, I usually turn to upma, pasta or polenta. Polenta is very easy to make and can be paired with vegetables in a variety of different ways. I like to have polenta by itself, with some herbs and parmesan cheese.

Cornmeal

Cornmeal, which is ground dried corn, is boiled in salted water, resulting in creamy and delicious polenta.

I usually serve polenta with roasted vegetables. Those odd vegetables lying in your crisper can be put to good use in this recipe. The roasted vegetable medley itself can be served as a warm salad too.

My favourite ingredient in this recipe is roasted garlic. Though I have given the recipe to prepare them beforehand, you can roast the garlic packets in the same pan where the vegetables are cooking. I always prepare extra bulb of roasted garlic and use them in other recipes. They stay good refrigerated for 2 weeks.

Ingredients

Polenta

Corn meal – 1 cup
Water – 4 cups
Butter – 1 tbsp
Salt – as needed

Vegetables

Fingerling potatoes or baby potatoes
French beans
Tomatoes
Roasted garlic
Olive oil
Salt
Pepper
Dried thyme – 1 tbsp
Dried rosemary – 1 tsp

Roasted garlic

Halve a whole garlic bulb horizontally. Place each half in two pieces of aluminum foil, drizzle with oil, salt and pepper. Wrap the garlic halves and roast in a 475F oven for 20 minutes. When they are cool enough to handle, squeeze the bulb and collect the roasted cloves of garlic. Use as needed in the recipe.

Roasted Garlic

Method

Heat water to a rolling boil. Reduce the heat to medium, add salt to the water. Slowly pour the cornmeal to the boiling water while swiftly whisking with the other hand to avoid lumps. Keep stirring for another 10 minutes until the cornmeal is cooked and comes together. Take off from heat, add butter and mix thoroughly.

Preheat oven to 450F. Halve or quarter the potatoes depending on the size. Snip the ends off french beans. Quarter the tomatoes. Cherry tomatoes can be used whole.

In a large bowl, toss the potatoes and beans with olive oil, salt and pepper. Place on a baking sheet and roast for 15-20 minutes, until the potatoes are tender and the beans is beginning to crisp.

In the same bowl, toss tomatoes in the remaining olive oil with thyme and rosemary. Add to the potatoes and beans, shake the baking sheet to rotate the vegetables, and roast for 5 more minutes, until the tomatoes soften. Add roasted garlic cloves to the vegetables. Adjust seasoning, if needed.

Serve vegetables with polenta, with a drizzle of balsamic vinegar, if needed.

Polenta with Roasted Vegetables

Melon Bruschetta

What better way to beat the heat than taking refuge in juicy, refreshing melons. Usually, bruschetta is served spicy, but for a hot summer afternoon, crusty bread with juicy fruit, is a perfect snack with tea. This is more than a recipe, its a method. Play with the combination of fruits until you find what you like the most. Pineapple, persimmons, grapes are some other candidates. Mint and rosemary go well with most of the fruits.

Ingredients

Crusty bread – sliced to ½ inch slices
Cantaloupe – 1 cup, diced
Honey dew – 1 cup, diced
Mint – 2 tbsp, finely chopped
Salt
Pepper
Olive oil

Method

Drizzle the bread slices with oil and toast them in a 350F oven for 8 minutes. Season them with salt and pepper when they are hot.

Combine cantaloupe, honey dew and mint together. Top over the toasts and enjoy.

Melon Bruschetta

Tomato Pickle

Few weeks back when Indira asked about our responsibility towards our favourite blogger, the first person to come to my mind was Saffron Hut. Hers was the one of the blogs I follow regularly for more than a year now. She has everything one can ask for in a blog, interesting and humorous posts (remember smelly cat), dependable recipes (it is from her I learnt to freeze rotis) and beautiful presentation. She is one of my inspirations to write a blog of my own. It is sad that she doesn’t blog that often as she used to, which, I inferred, is due to her health issues. I sincerely wish SH that she gets better and come back to us, the food blogging community.

For this month’s MBP, themed Preserve it, hosted by Coffee, I am made her tomato pickle. It is easy to prepare, tasty and goes well with almost anything. I have made this pickle for quite sometimes now and I am happy the way it is, no changes at all. You can find the recipe aesthetically written in her blog. I am not even going to try match that :).

Tomato Pickle

Tomato pickle served with kuzhi paniyaaram.

Kuzhi paniyaaram is made with left-over idli batter, onion, green chillies, curry leaves and asafoetida. For other recipes and recommendations on the pan, visit Nupur and Indira.

Roasted Red Pepper Sauce over Tortellini

Tortellini are ring shaped pasta stuffed with various fillings such as meat or cheese. Originally from Bologna, Italy, legend has it when the gods walked the earth, an innkeeper was so enchanted with the beauty of Venus, he modeled the little tortellini after her navel.

Vegetarian frozen tortellini are usually stuffed with cheese and can be used in soups. Boiled in vegetable broth with salt and pepper is my favourite way of preparing them. But most of the times I prefer tortellini light, hence I buy dried ones stuffed with a variety of vegetables. Though they taste good with bare vegetable broth, I jazz them up with a special ‘something’ that adds a homemade touch to the otherwise ordinary store-bought dinner.

The sauce is easy to whip-up with just your pantry ingredients. Roasted red pepper gives it a sweet, smoky but scrumptious flavour. I have used sun dried tomato and oregano tortellini in this recipe.

Roasted Red Pepper Sauce over Tortellini

Ingredients

Tortellini – ½ lb dried or 1 lb frozen
Roasted red pepper – 4 (about ½ of a 12 oz jar)
Onion – 1, small
Garlic – 3 cloves
Chilli powder – ½ tsp
Sugar – 1 tsp
Herbs of your choice (Cilantro, basil, oregano, thyme or parsley)
Salt
Oil

Method

Cook tortellini according to package directions, drain and reserve. Puree the roasted red peppers until smooth.

In a pan, heat oil, sauté onion and garlic until soft. Add the pureed roasted pepper, chilli powder, sugar and salt, and heat through. Stir in the herb and pour the sauce over pasta. Toss gently to coat and serve.

This is my entry for Waiter There Is Something In My... Sauce hosted by Andrew Barrow of Spittoon Extra.

Tomatillo Poricha Kootu – Tomatillo Dal

Nupur gave us the liberty of trying an unknown vegetable - X, for her A-Z of Indian Vegetables. There are many vegetables that I haven’t tried yet - artichokes, patty pan squash, mustard greens, to name a few. But when I went to the market these green beauties caught my attention. I have to admit that I have tried tomatillo once in a soup. It was too sour for my taste and I stayed away from it for almost a year now. Since this is an opportunity to try something new, I decided to give tomatillos a second chance.

Tomatillos

I wanted to carefully pair them with ingredients that will compensate the sourness. My mom prepares this dal or kootu using green, unripe tomatoes. Since tomatillos look like green tomatoes I decided to use them in this recipe. You can use other vegetables like chayote squash (chow chow), tomatoes (goes great with chapatti), carrot etc.

While buying tomatillos, buy small green ones. They look like green tomatoes with husk. The husk says a lot about its freshness. It should wrap the fruit tightly and should be light brown in colour. It should not be shriveled or dried. It is said that leaving tomatillos to rip further enhances its sweetness, I haven’t tried this though.

Ingredients

Tomatillo – 10 or 12, husked and chopped
Moong dal – ¼ cup
Coconut – 2 tbsp, grated
Green chillies – 4-6
Cumin seeds – 3/4 tsp
Mustard seeds – ½ tsp
Curry leaves – few
Turmeric powder – ¼ + ¼ tsp
Salt

Method

Cook moong dal with turmeric powder until soft. Grind coconut, green chillies and cumin powder into a fine paste.

In a vessel boil tomatillos in ¼ cup of water with salt and turmeric powder. The tomatillos turn from bright green to greenish yellow as they cook. Mix dal and ground spice mixture to the vegetable and simmer for 5 minutes.

In a seasoning pan, heat oil, splutter mustard seeds and curry leaves and add to the dal. Serve with rice.

Tomatillo Poricha Kootu - Tomatillo Dal

Meme - 7 Random Facts About Me

I was hesitant when Sunita tagged me for this meme of 7 Random facts about me, because I don’t know whether there are any facts about me at all. But when Tee tagged too, I thought, what the heck. So here it goes.

  1. I am a cat fanatic. I have had 22 cats over 10 years before marriage. I can speak cat (like Dori speaks whale) and I can even understand their body language. Someday I want to write a book about cats.
  2. I have a great passion for music. Though I learnt Carnatic music for 7 years and have lost touch, I still can appreciate music in almost any form. You can find me humming a tune most of the times.
  3. I am a cartoonholic. Not only that, I love comic strips. My favourites are Calvin and Hobbes, Tin Tin and Peanuts, in that order.
  4. I and Usha at Samaikalam Vaanga were classmates during our post-graduation.
  5. I can easily start a conversation even with a stranger and can make friends within minutes. My ex-boss and a good friend calls me ‘Nokia Gal’, because I am always ‘Connecting People’.
  6. I landed in the world of food blogging through Gopalsworld. I came to his blog through a Google search and was drawn toward his writings. I noticed Shammi’s comment in one of his posts and was expecting yet another interesting and funny blog as her brother's. Interesting and funny, her blog is. But I noticed something else too, her food blog. From one click to another.. Well, rest is history (ya right!!) :).
  7. I cannot make pumpkin pie. Both the times I have tried making it had been more than disastrous. Ooey gooey mess it was. I have vowed never to make pumpkin pie again.
I tag Bharathy, Live to cook, Usha, Nupur, Susan, Rasa Malaysia, Komal and mrshbt. Do it only if you have the time and inclination. No pressure :)

Brussels Sprouts Sauté

Brussels sprouts, resembling tiny, tightly closed cabbage heads are members of the cabbage family and were first cultivated in Belgium, and hence the name. They are an excellent source of vitamin C and a good source of folate, potassium and vitamin K. They have the same cancer-inhibiting potential as cabbage and broccoli.

While buying brussels sprouts look for ones that are compact, bright green and firm to touch. They should not have yellow or wilted leaves. They don't take long to cook and can be steamed, sautéed, microwaved or boiled.

In spite of all these benefits, most people are apprehensive about them. It is because they have a slight bitterness and it is what I like about ‘em. If properly cooked and flavoured with right spices, they are delicately nutty. In this recipe, the acidity from tomatoes and sweetness from the bell pepper compensate for the bitterness, while creamy cashews take them to the next level. The spices used in this recipe are minimal, not overpowering the delicate flavour of brussels sprouts.

Brussel Sprouts

Ingredients

Brussels sprouts – 1 lb, about 20
Whole cashews – ½ cup
Tomatoes – 2, big, chopped
Red bell pepper – 1, cut into 1 inch squares
Mustard seeds – ½ tsp
Asafoetida – a pinch
Cumin seeds – 1 tsp
Turmeric – ¼ tsp
Chilli powder – 1 tsp
Salt
Pepper
Cilantro

Method

Cut the stalks of brussels sprouts and peel off outer leaves that are damaged. Wash and halve them. Some leaves will fall off, reserve them too for cooking.

Lightly toast the cashew nuts in a pan until golden brown. You can also roast the nuts in a 375F oven for 5 minutes, turning them once. Be careful not to burn them.

In a pan, heat oil on medium heat and splutter mustard seeds. Then add cumin seeds and asafoetida and roast them for few seconds. Remove pan from the heat for a minute and add chilli powder, turmeric and salt. Stir them for a minute, return the pan to heat and add tomatoes and brussels sprouts. Cover and cook, taking care not to break the brussels sprouts halves. Sprinkle water if necessary. When they are half done, add red bell pepper. Cover and cook for 5 more minutes or until brussels sprouts become soft and bell pepper retain their crunch. Remove from heat. Season with black pepper, if desired.

Just before serving, stir cashew pieces and cilantro into the curry. Serve warm with rotis or rice.

Brussel Sprouts Cashew Curry

Wild Rice Pulao

Wild Rice Medley

Wild rice has a signature flavour. It is nutty and pleasantly chewy when not overcooked. It is surprising to know that it is not actually a rice variety, rather the seed of a grass. It has more protein than white or brown rice and expensive too. Added to this, it takes longer to chew and hence the portion size is always smaller. They are great in salads too. More about wild rice here.

I have previously purchased wild rice in smaller quantities and was greatly impressed with its taste and texture. But when I wanted to make this for Nupur’s W of A-Z Indian Vegetables, I couldn’t find them. So I am using an organic rice medley which consists of wild rice, brown rice, sweet brown rice and heirloom red rice from Costco. I think this is the great way to start getting acquainted to both wild rice and brown rice, if you haven’t tried them yet.

Ingredients

Wild rice - 1 cup
Cumin seeds – 1 tsp
Fennel seeds – ½ tsp
Cinnamon – 1 inch
Bay leaf - 1
Onion – 1, medium sized
Green chillies – 2
Garlic – 2 cloves
Ginger – 4 inch piece, cut into big pieces
Mint – ¼ cup, finely chopped
Cilantro – ¼ cup, finely chopped
Oil
Salt

Method

Cook wild rice either in a sauce pan or pressure cooker. If cooking in a pan, boil 2 cups of water, add ¼ tsp of salt, rice and ginger. Reduce the heat to simmer, close the pan and cook for 30 minutes until done. After 25 minutes check for doneness, and add ½ cup of water if needed. If cooking using a pressure cooker, take 2 cups of water for 1 cup of rice and wait for 3 whistles. Allow to cool and fluff the rice with a fork. Adjust the rice-water ratio according to the hardness of your tap water. I cook white rice in 2:1 rice-water ratio due to the hardness of our water. Remove the ginger pieces from the rice.

In a skillet, heat oil, and splutter cumin and fennel seeds. Also add cinnamon and bay leaf and allow them to brown. Add onion, green chillies and garlic to the skillet and cook till onion turns translucent. Add mint and cilantro, stir well and add wild rice. Mix well, check for seasoning. This pulao pairs well with any vegetable gravy and raita or yogurt based gravy.

Wild Rice Pulao

Wild rice pulao and potatoes in yogurt sauce.

Check out how Indira serves her wild rice.

Punjabi Aloo

Regional Cuisine of India is a fine event that celebrates a cuisine of India every month. When I first came across this event I thought its going to be easy. No, its not. Not all South Indian fare is just idli and sambar and not all North Indian gravy is some curry or masala.

Food bloggers, each month come up with an interesting array of dishes that allow us to learn about the cuisine. As an added bonus, we get to learn that region’s customs and traditions and in some case, the blogger’s childhood memories tied with that recipe. All in all, it’s a wonderful experience for me, both as a participant and as a spectator. Who are we to thank for, to envisage such a brilliant idea that brings us together under one umbrella (or cuisine, should I say)? Lakshmi of Veggie Cuisine.

With that said, here is my entry for RCI Punjab hosted by Richa of As Dear As Salt. Yogurt and potatoes, along with the spices makes this simple but wonderful curry.

Punjabi Aloo

Ingredients

Potato – 3
Onion – 1, small
Tomato – 2, chopped
Peas – ¼ cup, frozen
Yogurt – ¼ cup
Ginger – 1 inch piece
Green chillies – 2
Red chilli powder – ½ tsp
Coriander powder – 1 tsp
Turmeric – ¼ tsp
Cumin seeds – ½ tsp
Salt

Method

Boil potato in lightly salted water and cut into big pieces.

In a skillet, sauté onion, green chillies and ginger in a tsp of oil. Allow this to cool and grind to a fine paste with very little water.

In the same skillet, heat a tsp of oil and splutter cumin seeds and add the onion paste. After allowing it to fry for 2 minutes, add the tomato pieces, turmeric, chilli powder, coriander powder and salt. After a minute, add potatoes and allow the gravy to boil. When the gravy becomes dry, add yogurt and peas and heat through. Serve while warm.

Round-up for the event so far

RCI Tamil – Lakshmi of Veggie Cuisine
RCI Andhra – Latha of Masala Magic
RCI Maharashtra I, II, III – Nupur of One Hot Stove

Bookmarking these pages is all one has to do to learn/gain expertise in these cuisines.

Food Photography

So its proven again that G is a better photographer. Duh! He is my photography guru, for crying out loud. Two years back if you had asked me for the exif of a photo, I would have said, “What?!”. And when G came into my life, I developed a liking towards photography for he was an excellent amateur photographer. I am glad I developed that interest, because, it is not easy to wait for 30 mins on a hike when he patiently follows an ant or focuses on a fallen leaf. But I learnt a lot on those long waits, patience being one of them :). Here are some of his photos.

IMG0339

IMG0069

PBase IMG0123

IMG0024

IMG0298

Only after starting this food blog did I realize that food photography is way different than others. It is not very easy to capture a pleasing picture of a dish, its texture and colour, lying in a small plate. Not to mention the feat of food styling and plating. G patiently learnt (food photography was new to him too) and taught me few tricks of the trade like macros, perspective of a shot, lighting, etc to make a picture interesting.

Therefore, I am not quite surprised that you liked his choice. I thank each one of you for letting me know your thoughts. But I still like the daytime shot of the Granita :).

Watermelon Granita

I notice a lot of blogging events themed on ice cream or other frozen treats this month. With the mercury on the constant raise, its fair to treat ourselves occasionally, may be often. Both G and I longed for something cool and refreshing as the temperature in my area is 116F for the past two days. I was not in the mood to make ice cream (Again, after that decadent semifreddo). So, I settled for granita. Unlike ice cream or sorbet, granitas are easy to make. They don’t require any special gadget, cooking or expertise. They are relatively low-fat too. My newly bought margarita glass is also one of the reasons, I must admit.

Watermelon Granita

While taking photos, G and I had a disagreement. I wanted to take a shot in the natural light, while he wanted a night time shot which will heighten the red colour of the granita. I couldn’t decide between the two as I liked ‘em both. To end the feud, I am going to post both the photos. Tell me what you like – the bold and colourful nighttime shot or the minimalist daytime shot.

Watermelon Granita

Ingredients

Watermelon cubes – 5 cups, seeds removed
Sugar – 1 cup
Water – ½ cup
Lemon juice – as needed

Method

Make the simple syrup by adding 1 cup of sugar to ½ cup of boiling water. Stir until sugar has dissolved and the solution becomes clear. Cool and reserve.

Blend watermelon cubes, simple syrup and lemon juice until smooth. Strain and taste the juice. It should be very sweet and with noticeable lemony taste. It looses some of its taste when frozen.

Pour the juice into a 9x13 baking dish or any shallow container and freeze for 3 hours. Scrape the mixture with a fork until its fluffy. Freeze again. Scrape and fluff the granita before serving.

Watermelon Granita

This goes to A Fruit A Month – Watermelon, hosted this month by Jai and Bee of Jugalbandi. Thank you Maheswari for creating this event which gives the fruit kingdom the respect it deserves. As much I am tempted to send this to Nupur for W of A-Z Indian Vegetables, I am restricting myself, because, this neither is a vegetable nor it is Indian. I have to come up with something else, Sigh!

Honey Semifreddo

When Meeta of What’s for lunch honey announced this month’s Monthly Mingle theme, I had already decided the entry. I was waiting for an occasion to make this special treat. And I did, for my Birthday!

Honey Semifreddo

The moment I laid my eyes on this recipe in Foodbeam by Fanny, I wanted to try it. It was sinfully delicious and its hard to believe that an easy recipe like this would yield something that is beyond words. You have to try this yourself to know how it tastes like. But be warned, this dish is beyond rich and creamy. So this is for those mighty hearts that braves calories. Hey, we live only once, so go ahead and indulge.

As Fanny describes, I only had a minute to take the pictures. It melts fast and then its Gooey Kablooie. Also, use the best quality honey that you can find. It makes a lot of difference here.

Ingredients

Heavy cream - 1¼ cups
Honey – scant ½ cup
Egg – 1
Egg yolks – 4
Hazelnuts – 2 tbsp

Method

Spray/coat a loaf pan with oil or butter, cover it with plastic wrap, set aside. Take a medium sized glass bowl and keep it in the freezer for 10 mins.

Boil a cup of water in a sauce pan and turn it into a simmer. Choose a bowl that partially immerses into the pan. The bottom of the bowl should not touch the simmering water. This is called a double boiler. Take egg, egg yolks and honey in the bowl and beat it with an electric beater over the double-boiler. The mixture will turn pale and creamy as the eggs get cooked indirectly.

Take the chilled bowl from the freezer and beat heavy cream till it forms soft peaks. Chilling the bowl contributes to stable peaks.

Gently fold the egg mixture into the whipped cream and pour into the prepared loaf pan. Cover the pan with plastic wrap and freeze for at least 3 hours.

Honey Semifreddo

To serve, transfer the pan from freezer to fridge for 5 minutes and invert onto a serving platter.

Slice and serve with hazelnuts and a drizzle of honey.

Honey Semifreddo

Thanks Fanny for this wonderful recipe which is now my all-time favourite!