











Three Potato Soup With Rouille

A Beautiful Bowl Of Soup by Paulette Mitchell is one of the cookbooks I refer to regularly. This book is a collection of amazing soups that fit all seasons. Chunky or creamy, dumplings or dessert, hot or cold, this book has it all. The recipes call for simple ingredients, which when put together in a single pot, works like magic. Well, that’s what soups are, one pot wonders.

I set out to try a soup from this book, which interestingly calls for three types of potatoes. But what drew me toward this recipe was the topping – Rouille. A sauce, which means rust in French, is typically served with fish soup or Bouillabaisse. It is made with breadcrumbs and saffron or red pepper for colour. I was bowled over by how creamy it was. If you like aioli, then this sauce (more of a paste) is a must try. The fresh garlic explodes once it touches the hot broth and the sauce melts turning the soup chunky to slightly creamy. Rouille is as tasty and creamy as aioli, but without the calories from mayonnaise.

Rouille

Ingredients

Bread crumbs – ¼ cup
Roasted red pepper – ¼ cup
Extra virgin olive oil – 2 tbsp
Fresh red chilli – 1, minced
Lemon juice – 2 tsp
Capers – 1 tsp
Garlic – 1 clove
Salt
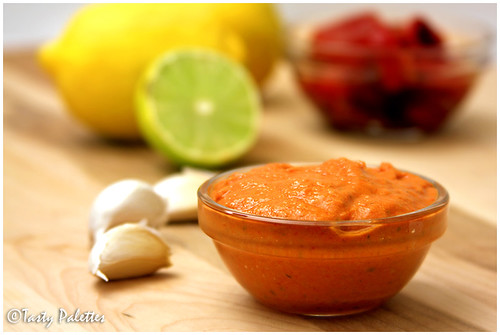
Rouille

Method

Take bread crumbs in a bowl and sprinkle a tbsp of water. You can also use the water from the jarred roasted bell pepper. Mix well, until it is crumbly and not soggy. Blend the crumbs with the rest of the ingredients given above, without adding extra water. Blend till smooth and set aside to allow the flavours to blend.

Soup

Ingredients

Yukon gold potato – 1, ½ inch dice
Red potato – 1, ½ inch dice
Sweet potato – 1, ½ inch dice
Onion – 1, chopped
Garlic – 2 cloves, minced
Saffron – ¼ tsp, crushed
Better than bouillon – 1 tbsp or 1 bouillon cube
Tomato – 2, chopped
Carrot – 1, ½ inch dice
Green chilli – 2, slit lengthwise
Chinese celery or Celery + Parsley/Cilantro – ½ cup, finely chopped
Oil – 1 tbsp
Salt

Method

Soak saffron threads in a tbsp of hot water. In a large pot, heat oil, and sauté onion and garlic, until soft. Add all the other ingredients except Chinese celery along with 4 cups of water. If using celery, add now, but reserve parsley for garnish.

Cover and let the pot simmer for about 15 minutes, until the vegetables are soft. Remove green chillies, stir in Chinese celery or parsley, and check for seasoning.

To serve, ladle the soup into a bowl and dollop rouille on top.
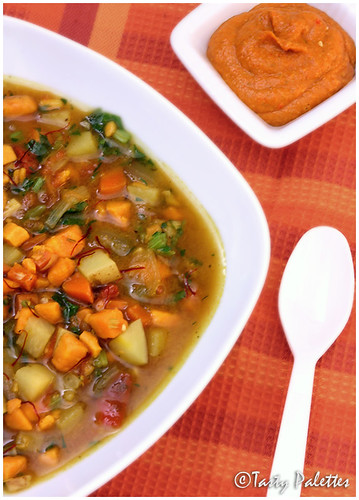
Three Potato Soup

This is my entry to Potato Fe(a)st, hosted by Dhivya Karthik of Culinary Bazaar. This bowl also goes to No Croutons Required hosted by Lisa at Lisa's Kitchen and Holler at Tinned Tomatoes. No Croutons Required is a new monthly soup and salad challenge.


Drink It … Down

By now, many of you know that my entry for Click – Liquid Comfort, won overall second place. While some of you guessed how the shot was staged, many of you were intrigued. To resolve the mystery, I decided to post the original staging of the shot.

Drink it... Down

Click, conceived and hosted by Jai & Bee at Jugalbandi, focuses on food photography based on a monthly theme. Many thanks to the judges and congrats to other winners.

Millet With Root Vegetables Bake

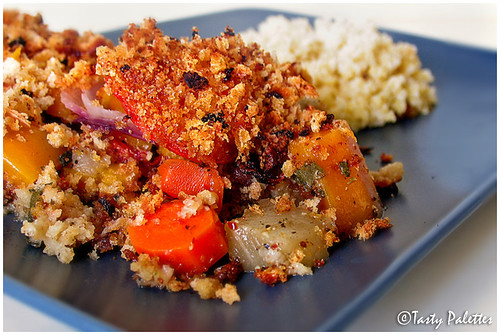
With root vegetables abundant during winter, I regularly bake ‘em and serve with a side of grains. Needless to say, this recipe is very easy and rustic. Cut the vegetables into big chunks, mix with seasoning and herbs, and slide into the oven. While the vegetables are baking, take care of the carb. Serve as a quick, but filling, lunch or supper, on weekdays. There are umpteen recipes for root vegetables bake. But there are few things I want to discuss about this combination.

Millet With Root Vegetables Bake

In addition to eating right, I monitor our sodium intake very seriously. According to American Heart Association, our daily sodium intake should be 2300 mg, which translates to a tsp of salt. While I am no where near the perfect number, I reduce sodium sensibly in my day-to-day cooking. To achieve this, I use a combination of salt substitute and salt free seasonings.

Salt free seasonings are pre-mixed herbs, that add flavour without sodium to the dish, hence no compromise in taste. There are many herb blends offered by different brands. Choose what appeals to you. My favourite choice is Mrs.Dash – Original Blend.

Another option is using salt substitute. Salt substitutes are essentially potassium chloride, as against to sodium chloride in table salt. It is particularly helpful for people with high blood pressure, who need to keep their sodium intake under control. But, I strongly recommend consulting your physician before including salt substitute in your diets. If your body cannot handle potassium, then this may prove to be fatal. I also find that salt substitutes have a slight after-taste, hence I use this in conjuction with table salt. The brand I use Morton salt substitute.

Ingredients

Potato – 1, peeled and cut into 1 inch cubes
Sweet Potato – 1, peeled and cut into 1 inch cubes
Carrot – 1, cut into 1 inch rings
Red onion – 1, small, sliced into thin rings
Tomato – 2, sliced into thin rings
Bread crumbs (preferably flavoured) – ¼ cup
Olive oil – 1 tbsp
Fresh herb (like Sage, rosemary or oregano) – 1 tbsp, chopped
Salt free seasoning (Mrs.Dash) – 1 tbsp
Pepper

Root Vegetables Bake

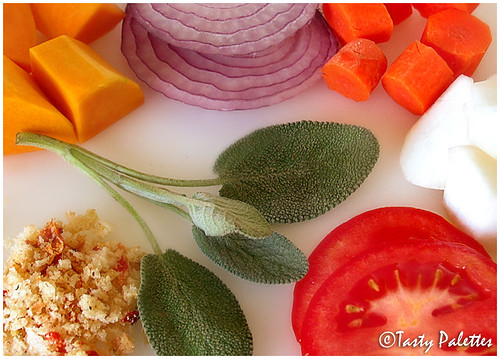
Clockwise from top left: Sweet potato, Red onions, Carrot, Potato, Tomato, Sage, Breadcrumbs. I used fresh breadcrumbs made from garlic and sun-dried tomato bread.

Method

Take potato, sweet potato and carrot in a bowl. Toss the vegetables with half of the oil, chopped herb, Mrs.Dash and pepper. In a separate bowl, mix breadcrumbs with the rest of the oil.

In a loaf pan, transfer the seasoned vegetables. Top it with a layer of onion, followed by a layer of tomato. Finally, spread breadcrumbs evenly, which provides texture and crunch. Bake for 35-40 minutes, until the vegetables are cooked through. Serve hot with your choice of carbohydrate like rice, quinoa, millet or couscous.

Millet

To make this a balanced meal, I include a side of carbohydrate, but this is optional. With any vegetable bake, quinoa was always my first choice, followed by brown rice. When I am short on time, I also make whole wheat couscous. But, after seeing this post of Indira’s, I was quite intrigued with what millet is. I was surprised with what found.

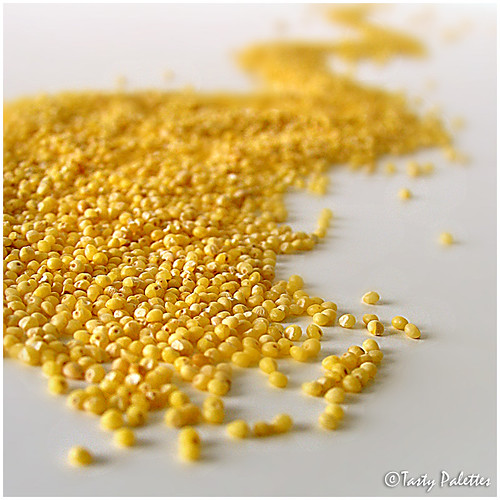
Foxtail Millet

Foxtail millet is one of those forgotten grains that were a part of our ancient Tamilian culture. Foxtail millet, called ‘Thinai’ in Tamil, is offered to Lord Muruga, the patron deity of Tamil Nadu. Millet flour was usually sold outside Murugan temples and I remember how I used to love eating this as a kid. The flour itself is slightly sweet and is normally eaten with honey. Farmers in ancient India, ate a handful of this flour for breakfast before a long day in the fields. Packing a mighty power punch, no glucose powder can come near this. I was delighted to rediscover this childhood favourite of mine. Our beloved Mathy of Virundhu has left a comment on Indira’s post, which explains the story behind millet and Lord Muruga. Leave it to her for story-telling :)

Cooking Millet

Millet – 1 cup
Water – 2 cups

Pressure cook millet with water for 2 whistles. Once the pressure is released, let the grains cool for about 5 minutes. Fluff with a fork and serve warm. If cooking on stove-top, bring water to a boil and add millet. Cook covered for about 25-30 minutes, without stirring in between. The grains will turn translucent and soft once cooked. Fluff and serve.

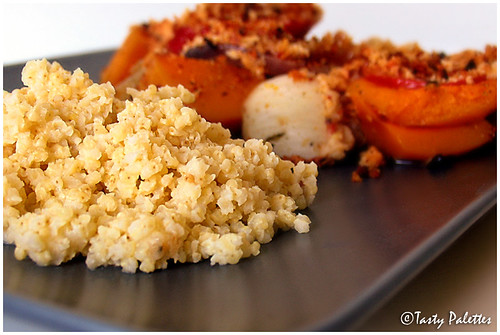
Millet With Root Vegetables Bake

Millet is slightly chewy and nutty, and is available in bulk bins at Whole Foods. Check out foxtail millet upma at Vindu.

No Cinnamon Apple Turnovers

Cardamom-Clove Falvoured Apple Turnovers

Apple-Cinnamon seems to be the most popular combination around here. From pies to cookies, and fresheners to bath soaps, this is one combination that never goes out of style. I understand that apple-cinnamon evokes a festive mood, and reminds us of holiday season. But it gets on my nerves to find the same flavour over and over again. Don’t get me wrong, I do love cinnamon. Only that I prefer using it in savoury dishes than desserts.

To break out from this monotonous practice, I made apple turnovers with cardamom. I grew up savouring cardamom, as most of the Indian desserts call for it. I knew we would love these even before I started, and right I was. The temptation was too much, that two of 'em were gobbled before I could take a picture. If you think apple-cinnamon is the eternal combination, give cardamom a try. You will know what I am talking about.

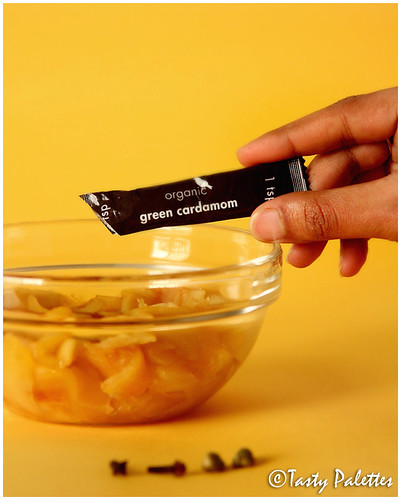
I have already made these turnovers thrice and the last time I made it using tsp spices. Few weeks back, Jaden at Steamy Kitchen, invited fellow bloggers to test this product. tsp spices packages and sells organic spices by the teaspoonful. So every time you open a packet, the rest of the box remains fresh and sealed. I volunteered to test cardamom with this recipe in mind.

The package was too pretty to open. I also found the cardamom seeds were neither whole nor finely ground, which is what I expected. The spice was fresh, aromatic and convenient to use. So if you like a well-stocked spice rack that remains fresh for a long time, tsp spices may be the solution you are looking for.

Making Apple Turnovers

Ingredients

Puff pastry – 1 sheet (I used Trader Joe’s artisan puff pastry)
Apples – 2, medium sized
Sugar – 2 tbsp + 2 tsp
Cardamom – ¼ tsp
Cloves – 2, heads only, crushed
Butter – 1 tsp
Lemon juice – 2 tsp
Egg – 1 (I used Egg Beaters)

Method

Preheat oven to 400F. Thaw puff pastry according to package instructions. Peel, core and thinly slice. If using whole egg, beat the egg with a tbsp of water for egg wash.

In a skillet, melt butter, add apples and sauté until soft, about 5 minutes. Sprinkle 2 tbsp of sugar, cardamom, cloves and lemon juice and stir for another minute. Remove from heat and let cool.

Cut puff pastry into 4 squares. Brush the edges with egg wash. Place 1/4th of the filling in each of the squares and fold over to make a triangle. Press the edges together with a fork to seal. Transfer to baking sheet and brush the top with the remaining egg wash. Sprinkle the rest of the sugar over the turnovers and bake for 10 minutes. Lower the oven temperature 350F and bake for additional 10-15 minutes until the turnovers are golden brown and puffed. When done, cool on a wire rack for 15 minutes and serve warm. The turnovers can be stored at room temperature for 2 days.

Cardamom-Clove Falvoured Apple Turnovers

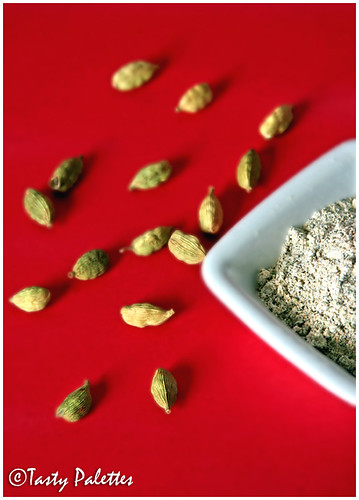
Ground spices can be prepared at home. But with cardamoms, the tough skins are not that easy to crush or grind. Sure you can use and save skins to be used later in tea or curry. But I find this inefficient. Instead, I follow what my mom does. As I said earlier, cardamom is used in many Indian sweets prepared during festivities. Hence, before the start of the festival season, my mom grinds a handful of cardamom with a tbsp of sugar in a spice grinder. The sugar provides enough friction to grind even the skins to a smooth powder. If stored in an air tight container, this remains fresh for 6 months. This way, the cardamom skins are used as efficiently as the seeds. Just a tsp to tea or curry would suffice.

Ground Cardamom

Weekend Breakfast Blogging – Healthy Eats

Weekend Breakfast Blogging, the acclaimed food event started by the talented Doc and cognizant nutritionist, Nandita at Saffron Trial, comes to Tasty Palettes this month. Thank you Nandita, for this wonderful opportunity.

What is better than having a satisfying first meal of the day? Having one on the weekends. Winding down from the previous week and getting ready to face the next week, its important to sit down, relax and spend quality time during weekends. Having a hearty breakfast during weekends gets me into vacation mood – lazy and relaxing. It also gives me ample time to think and execute a special lunch, amidst other weekend activities. Though it sounds like an occasion to indulge, I make sure it is healthy.

Past editions of WBB have been centered on various different themes - interesting and challenging. But this month, I will not bind you with any theme, as such. It can be of any cuisine; sweet or savoury; baked, steamed or sautéed. Although, there is one condition, it has to be healthy.

‘Healthy’ is a relative term. What one views as healthy, may be bland in others standards. For example, I may see egg yolks as 70% cholesterol, while someone else may look at it as 3g of protein. Hence, I ask you to be the judge of your own recipes. Meals that are balanced and include various different food groups like fruits, vegetables, whole grains, low-fat dairy products, etc are welcome. That being said, I invite you all to participate in this edition of WBB – Healthy Eats.

Weekend Breakfast Blogging - Healthy Eats

Please keep in mind the following rules while participating in the event.

  • Prepare a dish that is nutritious, well-balanced, healthy and can be served at breakfast. Only vegetarian/vegan entries, please. Post about it in your blog during Feb ’08.
  • Provide a link back to this announcement and feel free to use the logo.
  • Email your entry to tastypalettes@gmail.com , with WBB – Healthy Eats in the subject line. Enclose a picture of your entry, if any (250 pixels wide, height does not matter), with your email.
  • If you don’t have a blog, please email me your recipe and picture.
  • The deadline for this event is Feb 29, 2008 (it’s a leap year, remember?). The roundup will be posted during first week of March ’08.

Looking forward to receive your inspiring creations. For last month’s WBB edition, visit Rajitha at Hunger Pangs.

Drink It Up

I have been doing some experiments for this month’s Click – Liquid Comfort. After a few unsatisfactory attempts, I had almost given up. ‘Better luck next time’, I said to myself. Looking at my failed experiments and taking pity on my plight, G agreed to help me. He gave me this fabulous idea and helped me take this shot.

A colorful non-alcoholic cider was our choice of liquid comfort. Served hot or cold, this versatile winter favourite can be enjoyed by adults and children alike.

Part Photography - Part Presentation, this shot was not as easy as I had thought it would be. Turns out, taking a high speed shot without flash in natural light is quite tricky. We had to use a combination of home-made light reflectors to achieve optimum lighting against a white background. Not to mention the awkward positions we had to be in to hold the frame in position.

Winning shot or not, I learned so much and had fun doing so, with my beloved G.

Drink It Up

Incidentally, this post is quite fitting in this moment of celebration. I just noticed that this is my 101st post. I have been blogging only for 8 months, but it sure does feel like a long time.

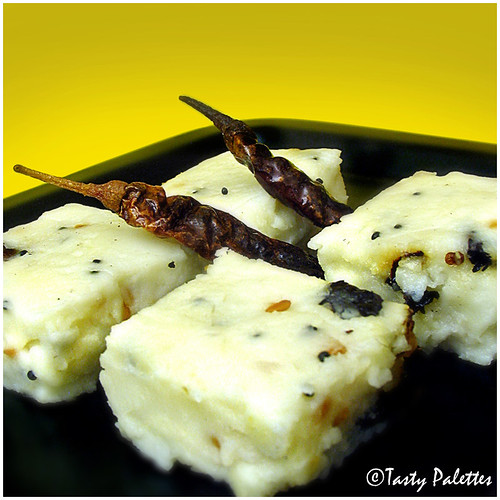
Mor Kali

Mor Kali

Mor kali is one of my childhood favourites. Slightly gooey and tangy, it can be prepared in a jiffy. No vegetables to chop and no spices to grind. The only catch is to keep stirring it for about 15 minutes until everything comes together. It also needs more oil to get it moving, without clinging onto the sides of the pan.

To avoid excessive oil and constant stirring, I make this in the microwave. It cuts down the cooking time and the taste is just the same as the traditional one. Except, for those tasty burnt bits stuck to the bottom of the pan. Well, you have to loose some to gain some.

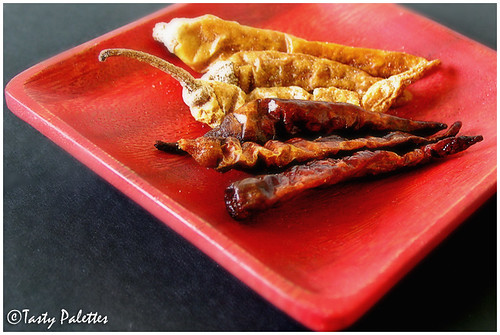
Though red chillies are the usual norm in this kali, my mom replaces them with ‘mor milagai’ (green chillies that are marinated in yogurt+salt and sun-dried). These cured and sun-dried chillies stay forever, if stored properly. These chillies are not hot, but aromatic and flavourful. When needed roast a few in very little oil and store in an air-tight container for about 10 days. They go well with yogurt rice, pulao etc. If you can get them, be sure to use in this recipe.

Mor Milagai - Raw And Raosted

Chillies cured in yogurt sun dried - Raw and roasted

I don’t make tadka or seasoning in a microwave oven, due to prior bad experiences. If you are comfortable, this dish can be entirely done in the microwave. This is my entry to Microwave Easy Cooking – Tiffin, hosted by Srivalli of Cooking 4 All Seasons.

Ingredients

Rice flour – 1 cup
Buttermilk – 3 cups
Salt – about 1 tsp
Mustard seeds – ½ tsp
Urad dal – 1 tbsp
Chana dal – 1 tbsp
Mor milagai/Chillies cured in yogurt or Red chillies – 4
Oil – 1 tsp

Method

In a microwave safe bowl, mix rice flour, buttermilk and salt without any lumps. The mixture should be of idli/dosa batter consistency. Heat oil in a seasoning pan over stove-top, splutter mustard seeds, and roast urad dal, chana dal and yogurt-chillies. Add this to the rice flour + buttermilk mixture. Mix well and cook in the microwave for 10 to 13 minutes, stirring every 3 minutes. The kali will stick to the sides of your mouth when not fully done. The mixture will thicken and become translucent when cooked.

If desired, transfer to a well oiled plate, smoothen the top and let cool. Cut into 2 inch squares and serve. Else, serve like a pudding. The kali can be cooked longer for a crumbly texture.

Mor Kali

Other versions of kali at The Singing Chef, and Menu Today.